With BI Pixie you can collect user feedback from your BI audience, and analyze user satisfaction. Extending BI Pixie to analyze both engagement and user satisfaction can be a powerful tool to optimize the effectiveness of your BI portfolio. To start collecting user feedback BI Pixie can instrument your target reports and add feedback controls to your Power BI reports.
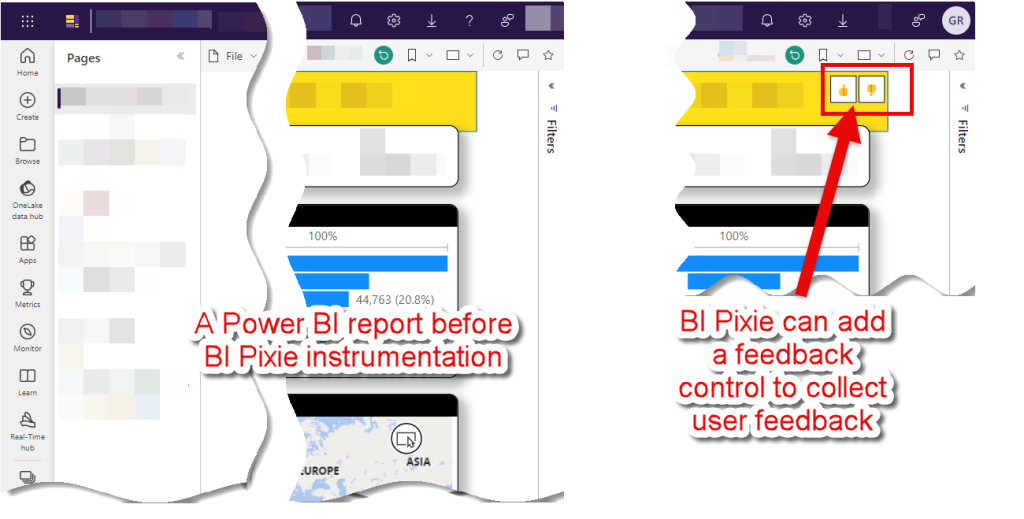
The feedback control that BI Pixie adds in your reports includes thumbs-up/down, smile/frown, or custom icons of your choice.
To enable feedback collection, follow the instructions in this article. We'll guide you through configuring the available settings to collect feedback from your report consumers in your designated reports.
The Feedback Control
Once feedback collection is enabled, BI Pixie instruments a Slicer or a Bookmarks Navigator at the top right corner of the first page of the target reports. This control is used to collect user feedback. It consists of two or three bookmark buttons: A left-button for positive feedback, a right-button for negative feedback and an optional center-button for neutral feedback.
Option 1: [thumbs up] [thumbs down]
Option 2: [smile] [frown]
Option 3: [thumbs up] [neutral] [frown]
When a report consumer clicks in one of the feedback buttons, the selection event is sent to your deployment of BI Pixie on Azure or Power Platform. The same user can click the feedback control multiple times. Later, during the analysis phase, you will be able to review user satisfaction by both counting the last feedback per user and report, or by counting all clicks by the same user and report.
The Feedback Control is offered in two modes: As a slicer in all the pages of the report or as a bookmark navigator in the first page (or other page).
You can select which method to use by setting the parameter collect_feedback_in_all_pages. When set to true, BI Pixie will add a Feedback Slicer on all the pages of the target reports. When set to false, the Bookmark Navigator will be added to the first page or one other page (based on the page index you select in collect_feedback_in_page parameter).
Collect Feedback in All Pages
When you activate the Feedback Collection feature in all the pages by setting collect_feedback_in_all_pages as true, the Feedback control will be added to each page of your target reports.
Under the hood, BI Pixie will add a hidden calculated table to the local Semantic Model of the report (unless the report is connected live to an external Semantic Model). The calculated table name is PixieFeedbackSlicer. The table will include two rows for the Thumbs up/down or Smile/Frown icons that are used as the data source for the slicer. Below you can learn how to configure the icons that will be used in the Feedback Slicer.
Using the Feedback control to collect feedback allows you to collect different feedback at the page level of your target Power BI reports. However, as this method adds a new table to your Semantic Model, it is recommended to refresh it before you share it with your audience.
When your target report has a live-connection to an external Semantic Model, the Feedback Slicer will not be added to the report pages unless the external Semantic Model already has the PixieFeedbackSlicer table based on a previous instrumentation you have made to report that is attached to that Semantic Model. In the default case where you don't have the PixieFeedbackSlicer table in the external Semantic Model, BI Pixie will fall back to the second method and will add a Bookmark Navigator to collect the feedback from one page only (The first page by default, or the one you specified as described in the next section). If you convert your live-connection report to a Composite mode in Power BI, BI Pixie can add the PixieFeedbackSlicer table in the local Semantic Model, and the Feedback Slicer is added to your pages.
Collect Feedback in One Page
When you activate the Feedback Collection feature to one page only, by setting collect_feedback_in_all_pages as false, the Feedback control will be added to the first page as a Bookmark Navigator control. If you prefer to move the control to a different page, change the collect_feedback_in_page parameter to the position of the page (more details below).
Position Considerations
BI Pixie will add the Feedback control at the top right corner of the target pages. To avoid overlap between the control and other visuals at the top right corner, we recommend the following mitigation steps:
- After you run the first instrumentation, open the instrumented report using Power BI Desktop and review the relevant pages (All the pages when the Slicer was used or the first or designated page when the Bookmark Navigator as used).
- If the feedback visual overlaps with other visuals, reorganize the visuals and place the feedback control in your preferred position. You can change its position.
- Save the report publish it.
- Next time you instrument the report, BI Pixie will identify the new position of the feedback control and will maintain it.
- Between consecutive instrumentations you cannot change any of the feedback collection settings.
Note: To make changes in the Feedback control settings (e.g. to change the icons from Smile/Frown to Thumbs Up/Down, or switch from Bookmark Navigator in one page to Slicers in all pages) you will first need to run BI Pixie Instrumentation in a clean_only mode to remove all Feedback controls and then run it again with the new settings.
Setting Up User Feedback Collection
Open BI Pixie Instrumentation's target folder (by default it's where you have bi-pixie.exe). If you don't have the two configuration files bi_pixie_config.json and bi_pixie_config_details.json, follow this article.
To begin collecting user feedback in all the target reports open the global configuration file, bi_pixie_config.json.
To collect user feedback in specified reports only, or to adjust different settings per report open bi_pixie_config_details.json.
Important Note: If you already activated the Feedback Collection and instrumented your reports, any further changes in the settings will require first to clean the reports by running the instrumentation in clean_only mode using the following settings:
"clean_only": trueWhen you complete the instrumentation, change the Feedback collection settings as described in this section, and then set clean_only to false before you instrument the target reports again.
Step 1: Enable Feedback Collection
Since the Feedback Collection feature is disabled by default, the first step is to activate it. Set the collect_feedback_enabled field to true under the collect_feedback parameter:
"collect_feedback": {
  "collect_feedback_enabled": true,
  ...
}
Step 2: All pages (Slicer) vs. one page (Bookmark Navigator)
To add a Slicer in all the pages of the target reports, set collect_feedback_in_all_pages as follows:
"collect_feedback": {
  ...
  "collect_feedback_in_all_pages": true,
  ...
}
To add a Bookmark Navigator on the first page of the target reports, set collect_feedback_in_all_pages as follows:
"collect_feedback": {
  ...
  "collect_feedback_in_all_pages": false,
  ...
}
By default, the Bookmark Navigator is added to the first page. If you'd like to place it on a different page, set the collect_feedback_in_page parameter to the desired page number:
"collect_feedback": {
  "collect_feedback_in_page": 2
}
Step 3: Choose Your Feedback Icons
You have multiple options for the icons used in the Feedback control. Choose one of the following:
Thumbs Up/Down Icons: Set use_icons_thumbs_up_down to true if you prefer using thumbs up and thumbs down icons.
"collect_feedback": {
  ...
  "use_icons_thumbs_up_down": true
}
Smile/Frown Icons: Alternatively, set use_icons_smile_frown to true to use smile, neutral, and frown icons. Note that if use_icons_thumbs_up_down is also set to true, this parameter will be ignored.
"collect_feedback": {
  ...
  "use_icons_thumbs_up_down": false,
  "use_icons_smile_frown": true
}
Custom Icons: If you'd like to use your own custom icons, you can specify them under use_icons_other. Define each icon for positive, neutral, and negative feedback.
"collect_feedback": {
  ...
  "use_icons_thumbs_up_down": false,
  "use_icons_smile_frown": false,
  "use_icons_other": {
    "icon_positive": "...",
    "icon_neutral": "...",
    "icon_negative": "..."
  }
}
Step 4: Define Additional Settings
Tooltip Label: The feedback control has a tooltip experience (See question mark icon below) that appears when the end users hover on the control. When they click in the question mark, a tooltip with text appears. You can configure the text in that tooltip to call users for action.
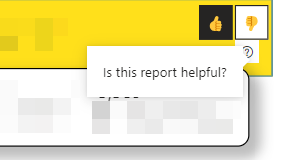
Set the tooltip_label parameter to define the message shown when users hover over the Feedback control tooltip icon.
"collect_feedback": {
  ...
  "tooltip_label": "Is this report helpful?",
  ...
}
When the Bookmark Navigator is used as the feedback control, the neutral button is hidden by default. In cases, you want to include it, you can set the hide_neutral_icon to false:
"collect_feedback": {
  ...
  "hide_neutral_icon": false,
  ...
}
By default, BI Pixie names the Feedback control as "BI Pixie Feedback Selector". The Power BI report authors can see the name of the control in the Selection pane of Power BI when they edit the report. You can change the name of the control by setting the feedback_selector_visual_name parameter. Don't change this parameter on reports that are already instrumented. Run clean_only first before you make the change. Otherwise, BI Pixie will not clean remove the old Feedback controls from the report during the next instrumentation.
Optional: Optimize Existing Bookmark Navigators
When the Bookmark Navigator is used as the Feedback control. BI Pixie adds three bookmarks to your target reports, and group them together. You can define the name of the bookmark group.
"collect_feedback": {
  ...
  "bookmark_group": "Feedback Selector",
  ...
}
If your reports have ungrouped bookmarks, when the new Feedback control will be added, all the ungrouped bookmarks will be populated to the new Bookmark Navigator. To avoid this undesired experience and keep only the feedback bookmarks in the Feedback control, you would need to group all ungrouped bookmarks and remove them from the Feedback Bookmark Navigator. BI Pixie offers you to do it automatically using optimize_bookmark_navigators parameter.
"collect_feedback": {
  ...
  "optimize_bookmark_navigators": true,
  "unassigned_bookmarks_group_name": "Grouped Bookmarks"
}
When set to true, all ungrouped bookmarks to a new group that will be used in any existing Bookmark Navigators.
When optimize_bookmark_navigators is set to true, BI Pixie performs the following actions:
- Creating a New Group for Ungrouped Bookmarks: All bookmarks in the report that are not already assigned to a group will be placed in a new group, "Grouped Bookmarks". This helps in keeping the existing bookmark navigators organized and separate from the newly added feedback bookmarks. You can define the group name by changing the
unassigned_bookmarks_group_nameparameter. - Assigning the new Group to Bookmark Navigators that have no assigned Group: BI Pixie identifies Bookmark Navigator controls that do not have a group assigned to them, and will assign them the newly created group. This ensures that existing bookmark navigators will not show the feedback bookmarks.
- Adding the Feedback Bookmarks in the Feedback control: The feedback bookmarks are added as a new group in the Feedback control. This action prevents other bookmarks to show in the Feedback control.
Known limitation
When using the Bookmark Navigators, the end-user may click in both Positive and Negative feedback buttons at the same session. In such cases, BI Pixie Dashboards allows you to analyze all the clicks or only the last ones per user and report.
When the end-user clicks Positive, Negative and then Positive again at a short timeframe, the last event may not be sent to BI Pixie as it is cached by Power BI. To overcome this issue, use the Slicers as the feedback control on all pages.
As end-users select Positive or Negative feedback to share, their selection are preserved in the Slicers or Bookmark Navigator until they change their selection or reset it. When you use the Slicers as the Feedback control, the last selection in the slicers are collected by BI Pixie each time the page is loaded. As a result, BI Pixie Dashboard, will count both the first time the feedback was provided and all the times the page was loaded with that feedback. To find the first date the feedback was provided, you can create new visuals using the Feedback table.
What's Next
More configuration options for BI Pixie Instrumentation
Analyze engagement at the visuals level using a heatmap