BI Pixie can be deployed in your Azure tenant or Power Platform environment to ensure that collected data will never leave your organization. In this article, you will learn how to deploy BI Pixie on Azure.
Deployment Prerequisites
- Before you start, make sure you have the Contributor role at the Resource Group you will use.
- The deployment requires a license key that you can get if you start a trial of BI Pixie. Contact us here to start the trial.
Background
Deploying BI Pixie on Azure allows you to set up a serverless web service in your Azure tenant. It collects usage events from your BI audience as they interact with your instrumented Power BI reports and stores the events in Azure Data Lake Storage Gen2.
The deployment is offered as an Azure Marketplace Solution Template or a Managed App (via the public or private offer). With the Solution Template you can:
- Start a new deployment of a single function app (Single Mode Deployment)
- Start a new deployment of two function apps (Dual Mode Deployment)
In this diagram, you can see the main resources of BI Pixie Azure Deployment in both Single and Dual modes.

The Solution Template includes the following resources:
- One or Two Azure Function App (Depending on the Single/Dual mode you select).
- One or Two Azure Storage Data Lake Gen 2 (ADLS gen2) storage accounts
- Azure Event Hubs – A new or existing Event Hubs namespace and Event Hub resource to handle high volume of Power BI events
- Azure Application Insights (Optional, but recommended) – You can create a new resource, use an existing one
Note: By deploying the solution template on Azure, you will be charged by Microsoft for the costs of the deployed resources. You can use your Azure credits for these resources.Note: We may refer to this deployment options as "Enterprise version" in older articles, recorded demos and presentations. To avoid confusion, the term "Enterprise" in this context is not related to the Enterprise pricing tier. You can deploy BI Pixie on Azure in any pricing tier of BI Pixie. Starting in February 2025, we now refer to this deployment as "BI Pixie Azure Deployment" instead of "Enterprise" to prevent confusion.Deployment Instructions
- Go to the Solution Template on Microsoft Marketplace, and select Get it now.
- In Confirm your details to continue window, select Get it now.
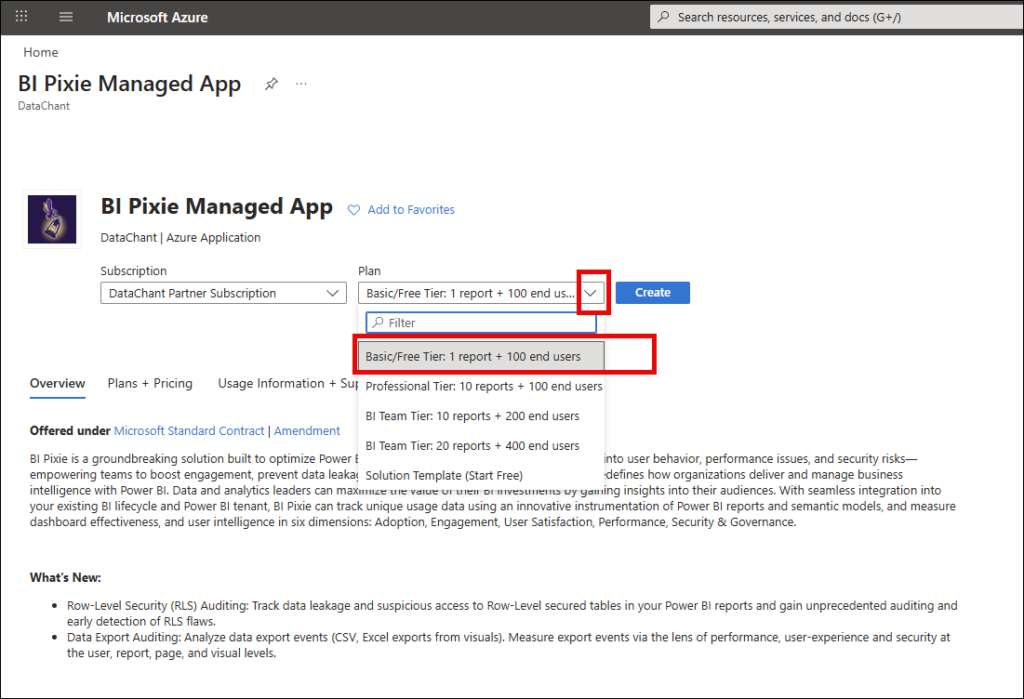
- Select a plan. Contact Sales for plan details and pricing.
- Select Create to start the deployment of BI Pixie.
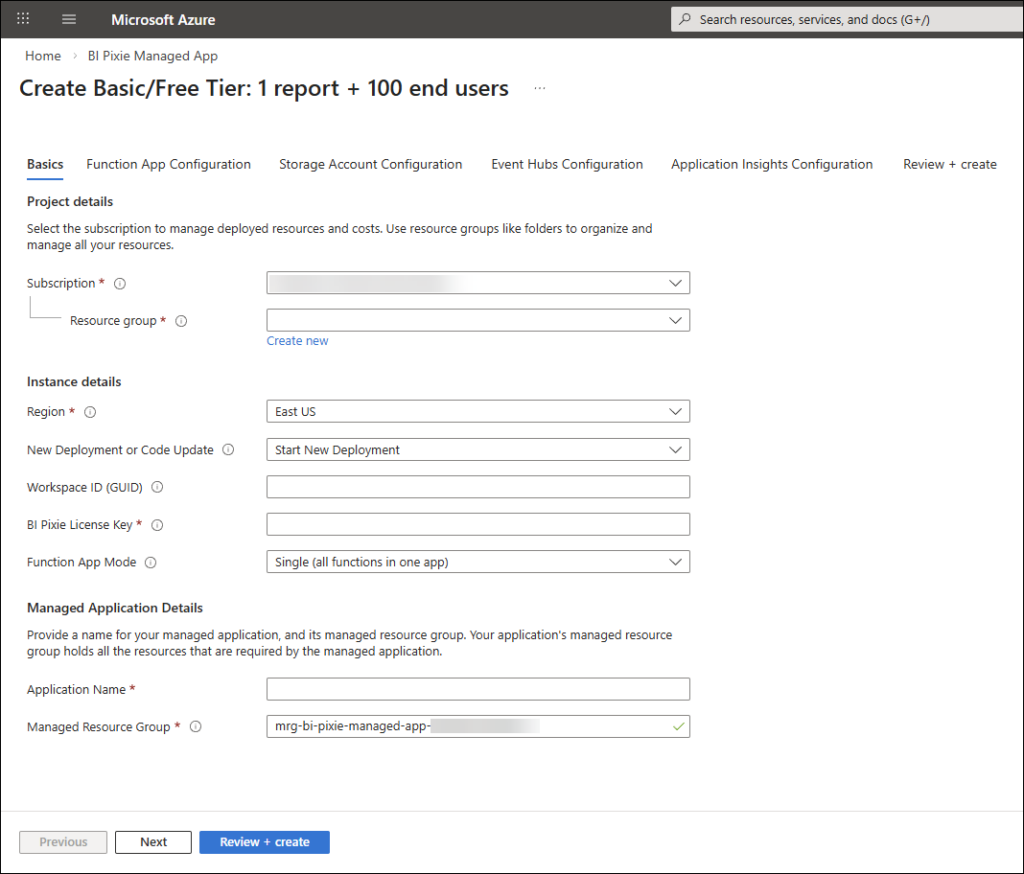
- In the Basics tab, select your Azure subscription in Subscription. You can select Create new to create a new resource group for the deployment of BI Pixie or use an existing resource group in Resource group.
- Select the region where you would like to deploy BI Pixie.
- In New Deployment or Code Update, select Start New Deployment to start a new deployment of BI Pixie. If you already deployed BI Pixie, you can select Update Functions in Existing Deployment, which will replace your existing BI Pixie functions in your existing BI Pixie deployment.
- If you use Azure Log Analytics to monitor the performance of your Power BI semantic models, enter the Log Analytics workspace ID in Workspace ID (This is optional. You can do it later in the deployed Function App as explained here).
- In BI Pixie License Key, enter the license key that we have sent you (You can get the key after you register for the trial here).
- In Function App Mode
,select Single (all functions in one app) to create a single Function App or select Dual (external and internal apps), If you want to deploy two Function Apps in order to harden the security of BI Pixie components and decouple between external and internal-facing functions. - In Application Name, enter the name of BI Pixie App as a single word (For example: bipixieapp). This name will be used as the name of BI Pixie managed application.
- In Managed Resource Group, enter the name for the managed resource group. For example: bi-pixie-managed-resource-group
- Select Next to create a new or define the existing function app.
Creating the Function App – Single Mode
Skip this section if you selected Dual mode in Step 10.

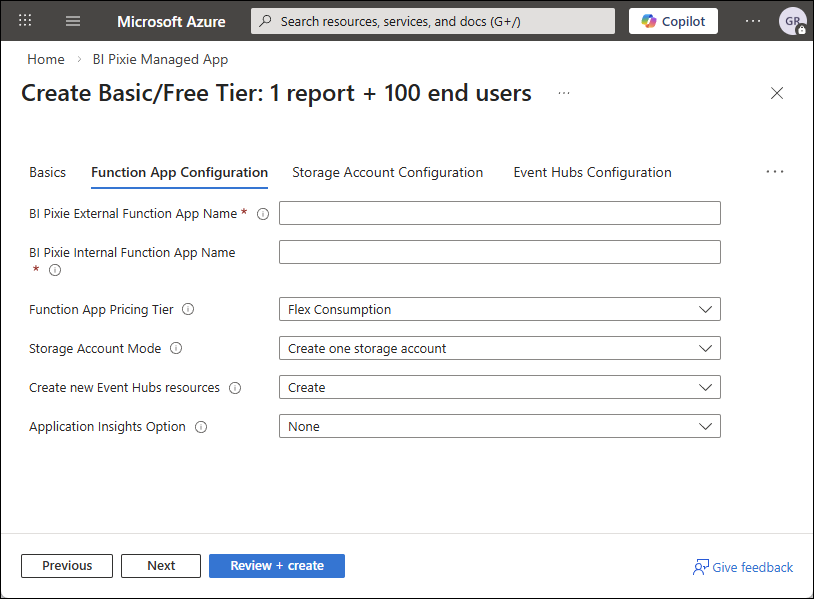
- In the Function App Configuration tab, enter a globally unique name in BI Pixie Function App Name. For example, enter bipixie[company][team].
- If you selected Update Functions in Existing Deployment in Step 5 above, select Review + create and go to Starting the deployment section below.
- In the Function App Pricing Tier, select the the tier you want to use. Your options are: Flex Consumption (Learn more here), Elastic Premium EP1, EP2 or EP3 (Learn more here).
- In Create new Event Hubs resources, select Create or Use Existing.
- In Application Insights Option, select None, New or Existing. Creating a new Application Insights resource or associating an existing one is optional. You add Application Insights resource to the function app later.
- Select Next.
- Skip to Creating The Storage Account section below.
Creating Two Function Apps – Dual Mode
Skip this section if you selected Single mode in Step 10.
- In the Function App Configuration tab, enter a globally unique name as BI Pixie External Function App Name. For example, enter bipixie[company][team]external. Enter a globally unique name as BI Pixie Internal Function App Name. For example, enter bipixie[company][team]internal.
- If you selected Update Functions in Existing Deployment in Step 5 above, select Review + create and go to Starting the deployment section below.
- In the Function App Pricing Tier, select the the tier you want to use. Your options are: Consumption (Learn more here), Elastic Premium EP1, EP2 or EP3 (Learn more here).
- In Storage Account Mode, select Create one storage account, or Create two storage accounts. Selecting one storage account will allocate one storage account to both internal and external function apps. It is recommended to create two accounts if you are on Dual deployment mode.
- In Create new Event Hubs resources, select Create or Use Existing.
- In Application Insights Option, select None, New or Existing. Creating a new Application Insights resource or associating an existing one is optional. You add Application Insights resource to the function app later.
- Select Next.
Creating The Storage Account
- If you selected Single mode in Step 8, in Storage Account Name, enter the name of the new storage account for BI Pixie. For example: you can enter a storage account name in this format: bipixiestorage[company][team].
- If you selected Dual mode in Step 8, and two storage accounts in Step 13, enter the internal and external storage account names. For example, you can enter bipixiestorageint[company][team] for the internal storage and bipixiestorageext[company][team] for the external storage.
- In Storage Account SKU, select the SKU and redundancy of the storage account(s). You can select one of the following options:
| Name | Description |
|---|---|
| Standard LRS | Standard Locally Redundant Storage |
| Standard GRS | Standard Geo Replicated Storage |
| Standard RAGRS | Standard Read-Access Geo Replicated Storage |
| Standard ZRS | Standard Zone Redundant Storage |
| Standard GZRS | Provisioned IO Locally Redundant Storage |
| Standard RAGZRS | Provisioned IO Locally Redundant Storage |
- Select Next to go to the Event Hubs Configuration tab.
Deploying Event Hubs
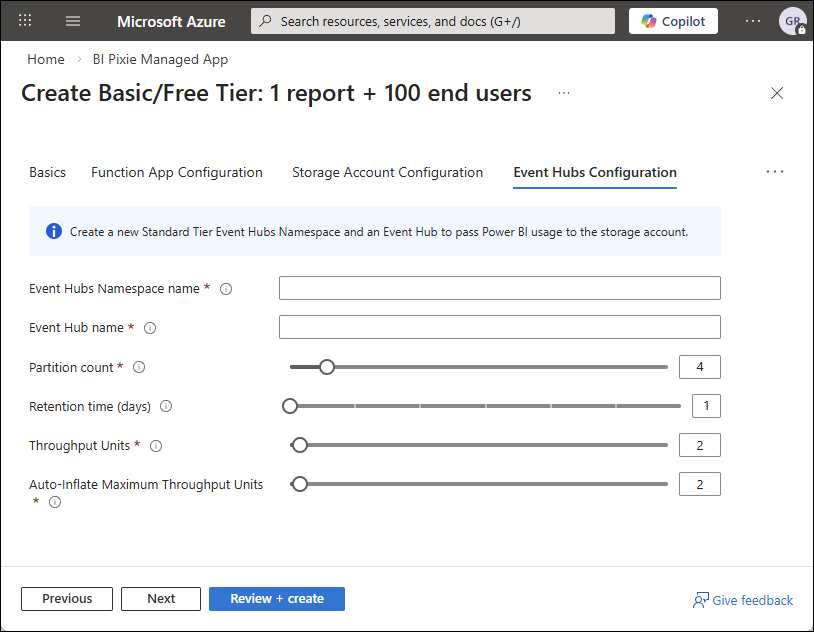
- If you selected Create in Step 17, enter a new globally unique name for the Event Hubs namespace in Event Hubs Namespace name, and then enter a name for the Event Hub in Event Hub name. For example: “[company]-bipixie-ns” will be the namespace and “bipixie-hub” can be the Event Hub name (The latter name doesn’t need to be unique).
- If you selected Use Existing in Step 17, enter the existing namespace and Event Hub you want to use.
- You can change the Event Hubs partition count from the default 4 to any number between 1 to 32. Read more about partitions here.
- Select the Retention time of the event logs in Event Hubs in days (between 1 to 7 days).
- Select the Throughput Units for Events Hub (Default is 2. You can select anything between 1 to 40). Read more about Throughput Units here.
- Select the Auto-inflate maximum throughput units. (Default is 2. You can select anything between the number of your previously-selected throughput units to 40).
- Click Next. If you opted out Applications Insight in Step 18, you can skip this step. In Application Insights Configuration tab, enter the name of the new or existing Application Insights, and select Review + create.
Starting the deployment
- Review the terms and select Create.
- The deployment can take few minutes. When it’s done, select Go to resource.
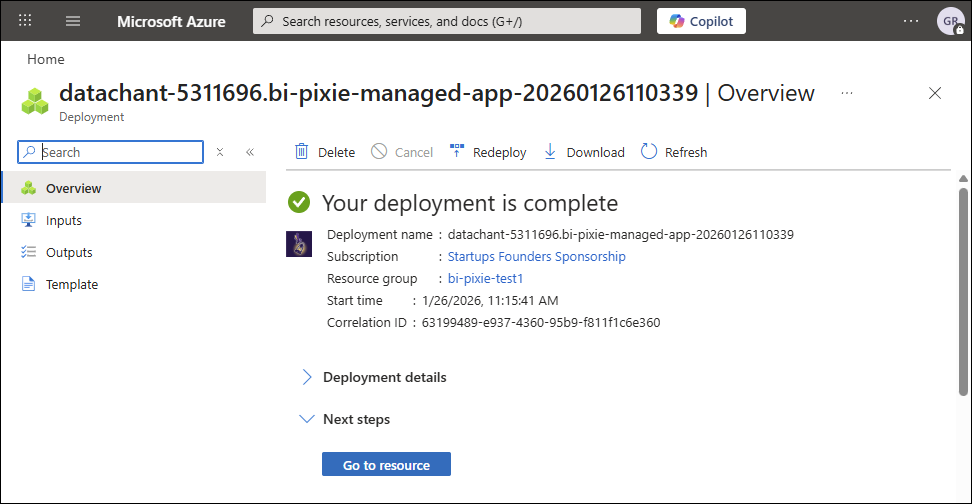
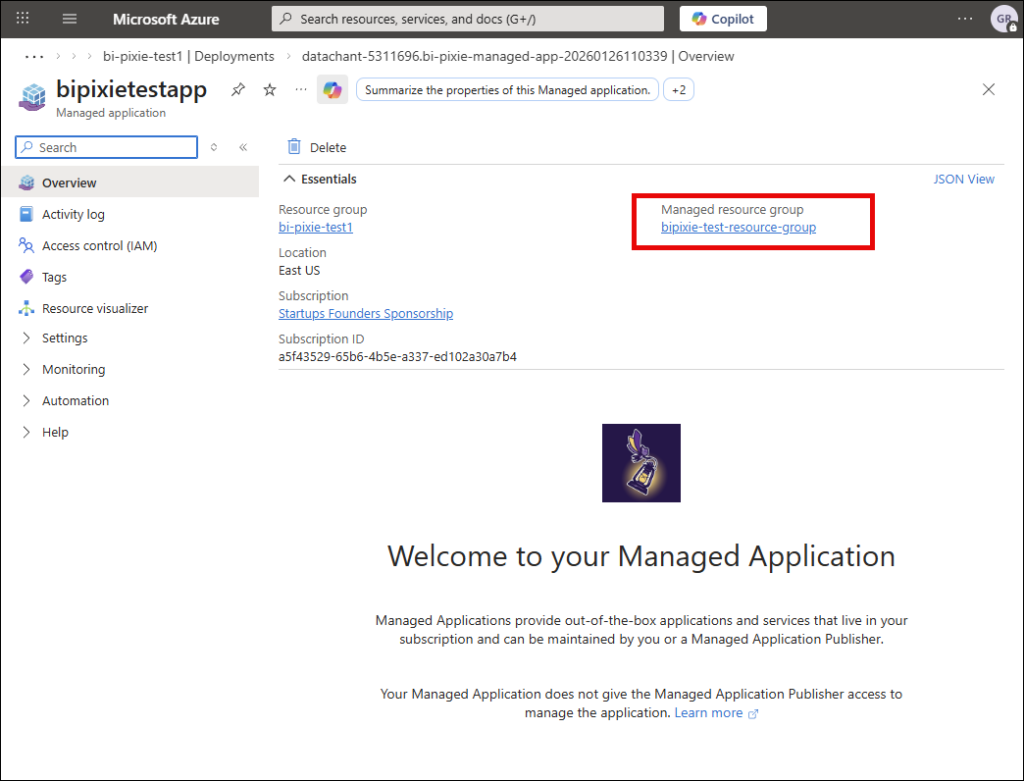
- This is BI Pixie managed application page. You selected its name earlier in step 11. You should note that we as the publisher have no access to the application and its resources. Click the hyperlink under Managed resource group.
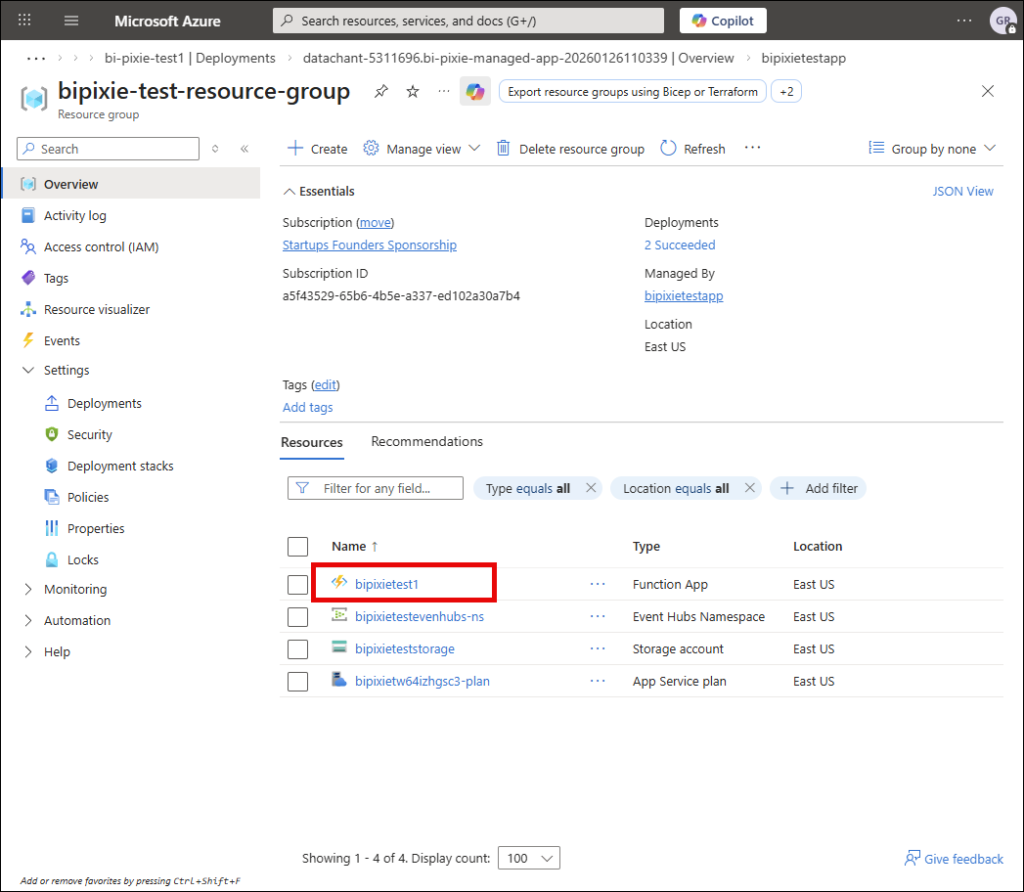
Getting the Function URL
In the managed resource group, you can find the Azure resources that you deployed for BI Pixie. In this section, you learn how to get the Function URL of BI Pixie which is needed by BI Pixie Instrumentation that is covered in the next article.
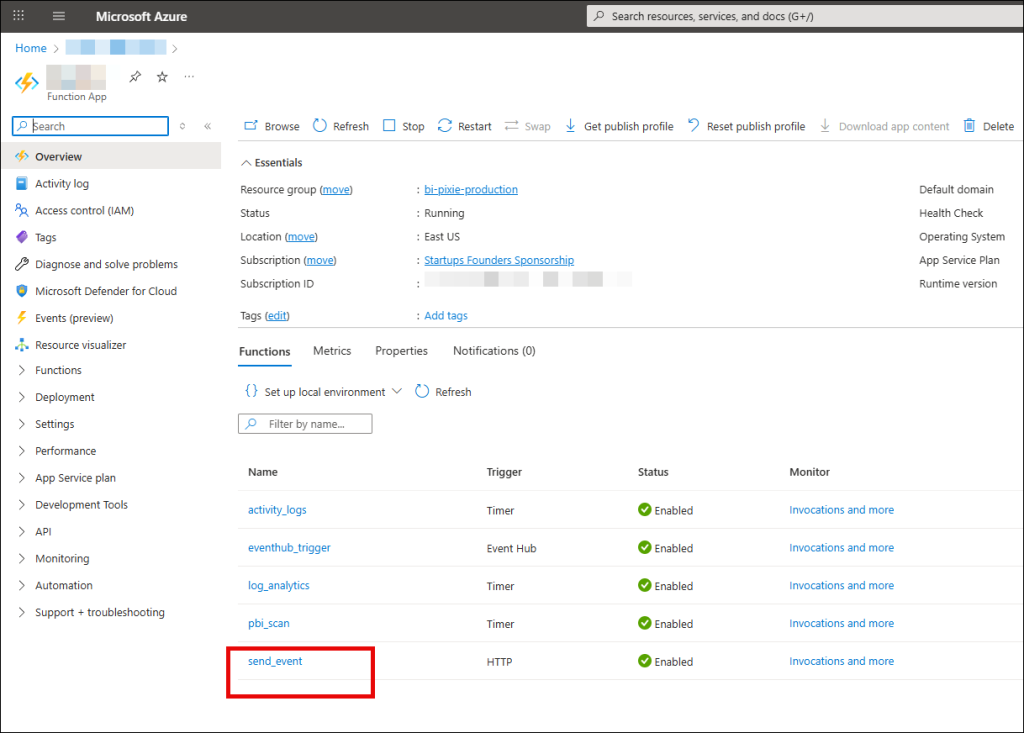
- If you deployed BI Pixie in Single mode, select the Azure Function App in the Resource group. If you deployed BI Pixie in Dual mode, select the external Function App in the Resource Group.
- In the Function App page, select send_event (In Dual mode, if you don’t see the send_event function, but you see the other four functions as shown in the screenshot below, it means that you selected the internal function app instead of the external one. In such case, select the external function app and then select send_event).
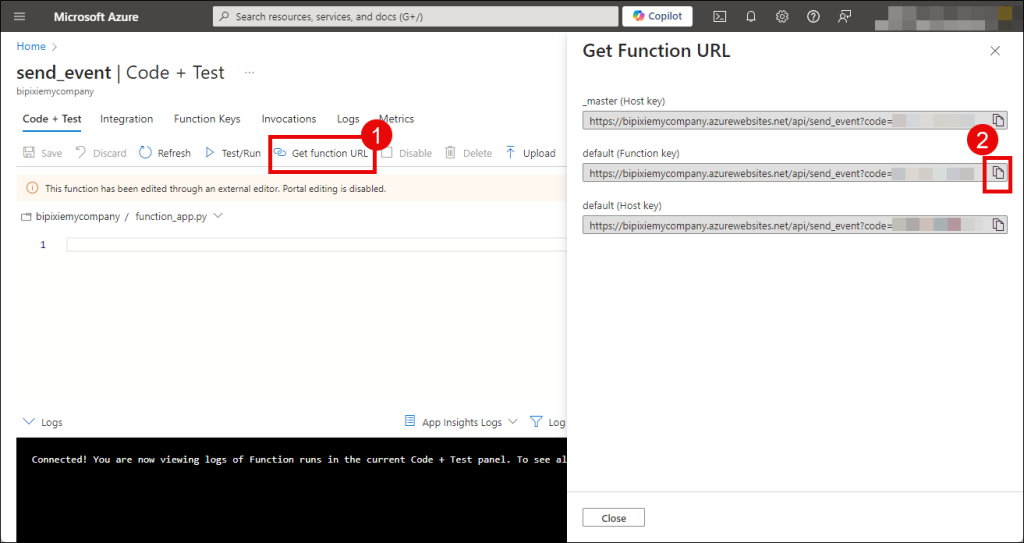
- In send_event page, select Get function URL. Once the Get Function URL pane loads, click the copy icon of default (Function key) field and save it; you will need it in the next article.
Optional: Collecting Power BI Activity Logs
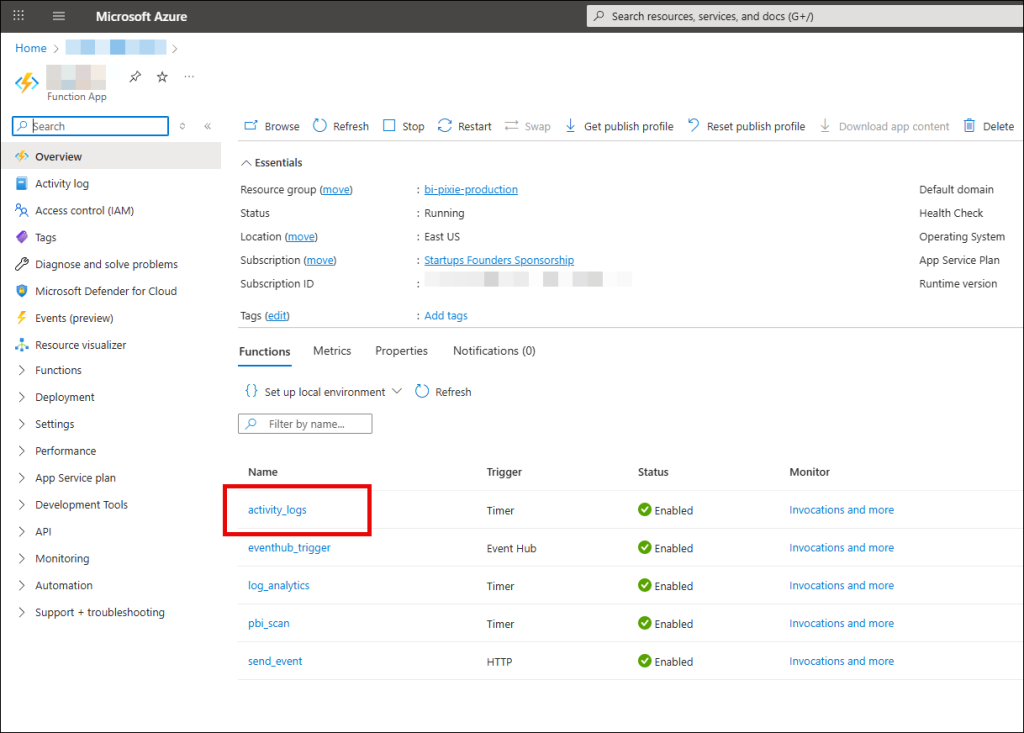
After the deployment of the Function App in Single mode or the Internal Function App in Dual mode, the activity_logs function will appear in the Function App page in Azure Portal. The activity_logs is a Timer function that collects your Power BI Activity Logs. By integrating BI Pixie with Power BI Activity Logs, you can track a wider set of activities and analyze then in BI Pixie Dashboard as described here.
To activate the activity_logs function, you will need to ensure it has the right permissions to access the Power BI Activity Logs. To do it, you need Power BI Tenant Admin permissions or ask help from the relevant administrator in your organization. Until you get the permissions, you can opt opt the activity_logs by disabling the function. To disable the function, click activity_logs and in the function page, click Disable. Once you have the permissions, you can enable it back from the function page by clicking Enable.
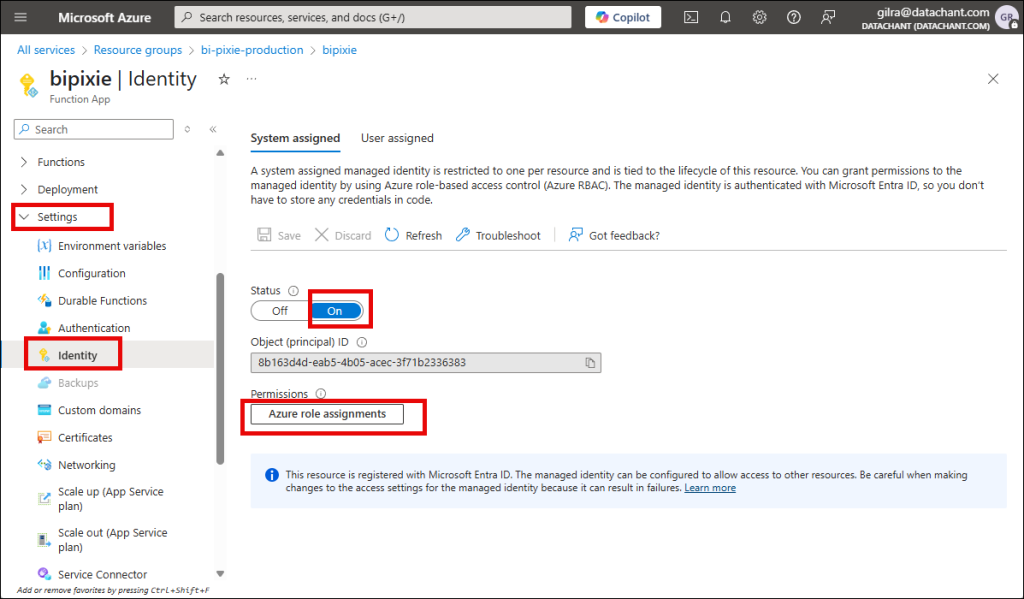
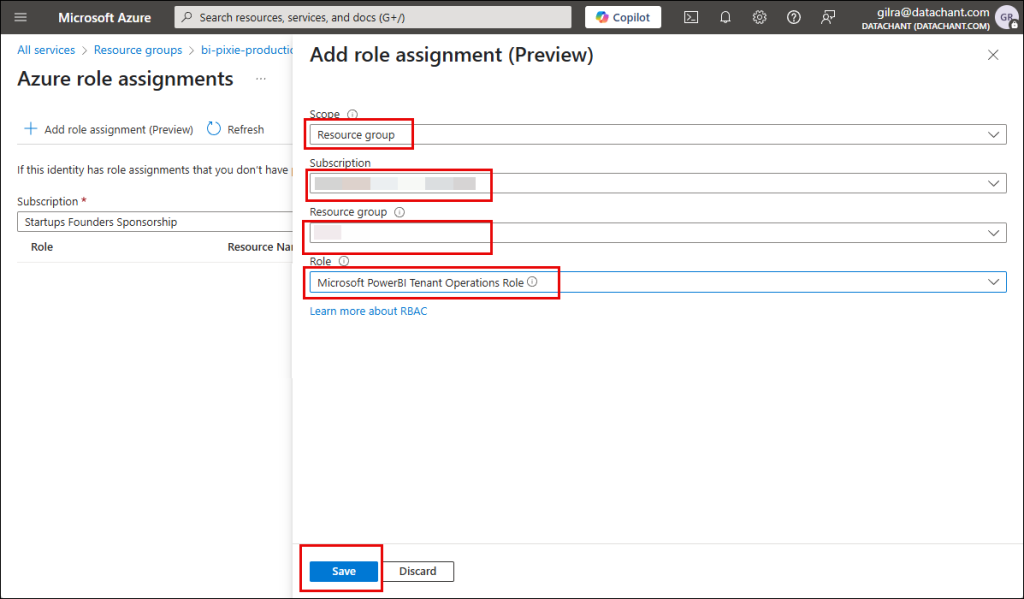
To allow the activity_logs function to collect Power BI Activity Logs, the first step is to assign the Power BI tenant role to the function app’s system-assigned managed identity.
- In the function app page, select
SettingsandIdentity. - In
System assignedtab, ensure theStatusisOn. - Click
Azure role assignments.
- In
Azure role assignmentspage, selectAdd role assignment (Preview). - In Add role assignment (Preview), select Resource group in Scope.
- Select the subscription of BI Pixie Function App in
Subscription. - Select the resource group of BI Pixie Function App in
Resource group. - In
Role, assignMicrosoft PowerBI Tenant Operations Role. - Click
Save.
If you are a Power BI Tenant Administrator, proceed with the steps below or ask your Power BI Tenant Administrator to follow these steps:
- Open the Power BI Admin Portal and go to Tenant Settings.
- Find Admin API settings
- Enable
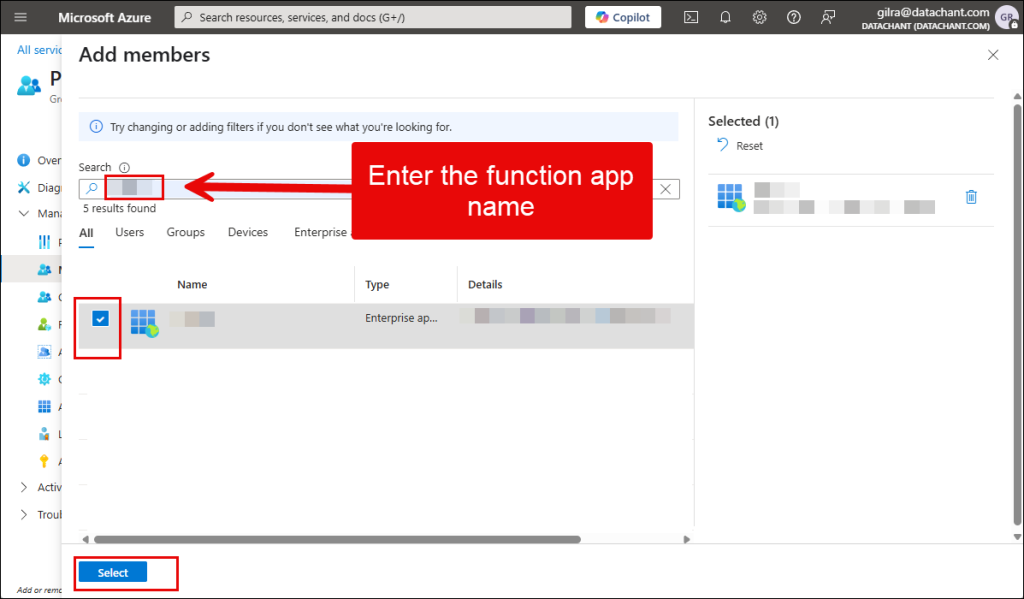
Service principals can access read-only admin APIs. If it was already enabled go to Step 5. - Assign a Security Group to Specific security groups,
- In Microsoft Entra ID, add BI Pixie Function app to the assigned security group that can access the read-only admin APIs. Select the relevant security group and click
Add members. In theAdd memberspage of the Security Group, you can enter BI Pixie Function App name (e.g. bipixie[Company][Team]) inSearch. Check the BI Pixie Function App in the search results section, and clickSelect.
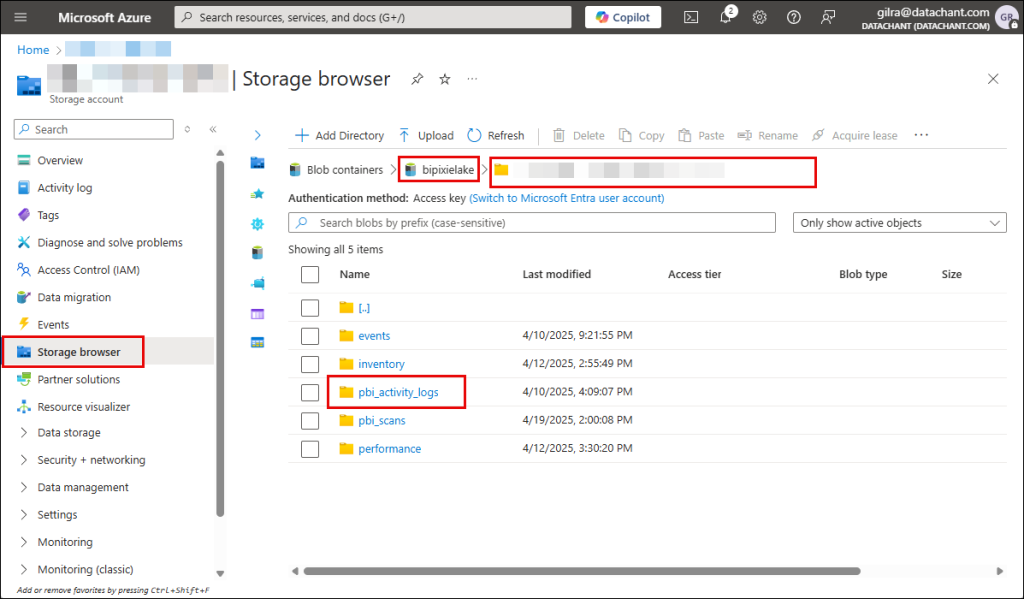
It can take 30 minutes for the permissions to get activated. To test that the activity_logs function works, go to BI Pixie Azure Storage account and open the Blob container bipixielake. You will find a folder with the license key. Under that folder you will find pbi_activity_logs folder. In that folder you will find the Power BI Activity Logs as Json files.
Optional: Scheduling the Power BI Activity Logs collection
Every you time you restart BI Pixie Function App, the activity_logs timer will initiate the next collection of the Power BI Activity Logs. Then, every round hour it will collect new activities. To change the schedule of the timer go to the activity_logs function page in Azure portal and follow these steps:
- In the function app page, select
Settings. - Select
Environment variables. - Edit the
PBI_ACTIVITY_LOGS_SCHEDULEvariable. - Change the schedule following the format here. The format is 6 numbers separated by a space character:
{second} {minute} {hour} {day} {month} {day-of-week}. You can use wildcards (*) at the level you want to run the function. For example: “0 0 * * * *” runs the function every hour at 0 minutes and 0 seconds. “0 0 8 * * *” will run the function at 8:00am every day. - Click
Apply. The function app will restart and the timer will activate an immediate collection of logs on start in addition to the collection of new logs following the new schedule.
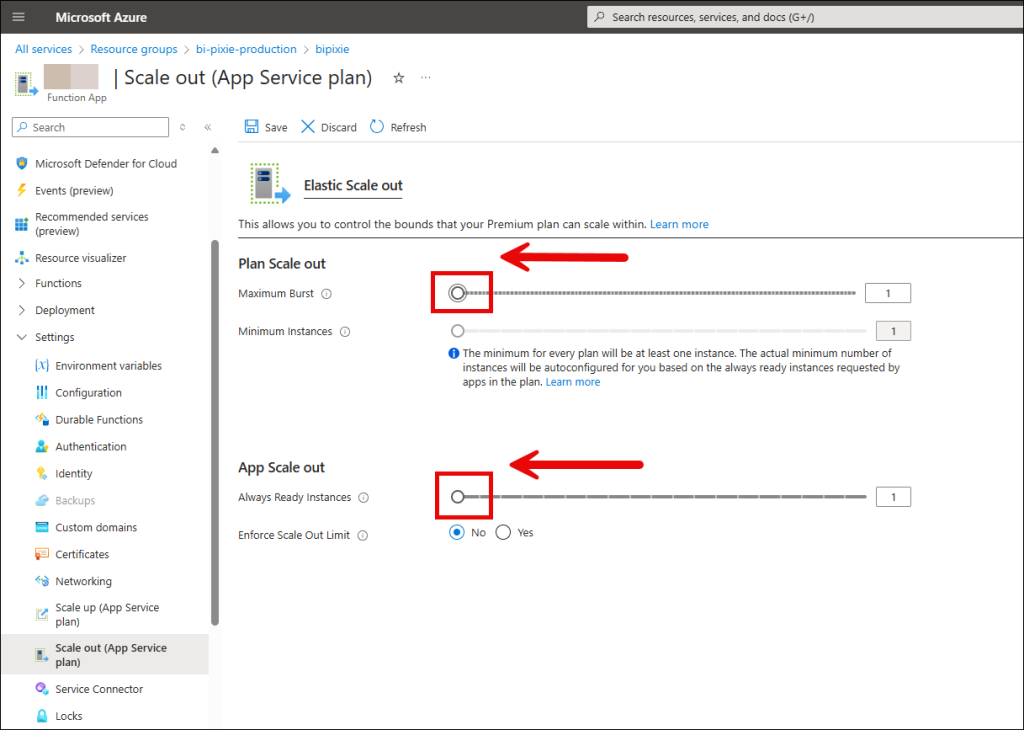
Minimizing Costs in Elastic Premium Tier
If you use Elastic Premium (EP1, EP2, EP3) as the pricing tier for BI Pixie Function App, we recommend that you scale down the App Service plan to a single instance if you have a low usage in your target Power BI reports or during the initial evaluation of BI Pixie. To scale down the App Service plan to a single unit, open the function app in the Azure portal, and select Settings. Select Scale out (App Service plan). Set both Maximum Burst and Always Read Instances to 1. Then click Save. This will ensure that you are charged only for one instance of the Elastic Premium Plan.