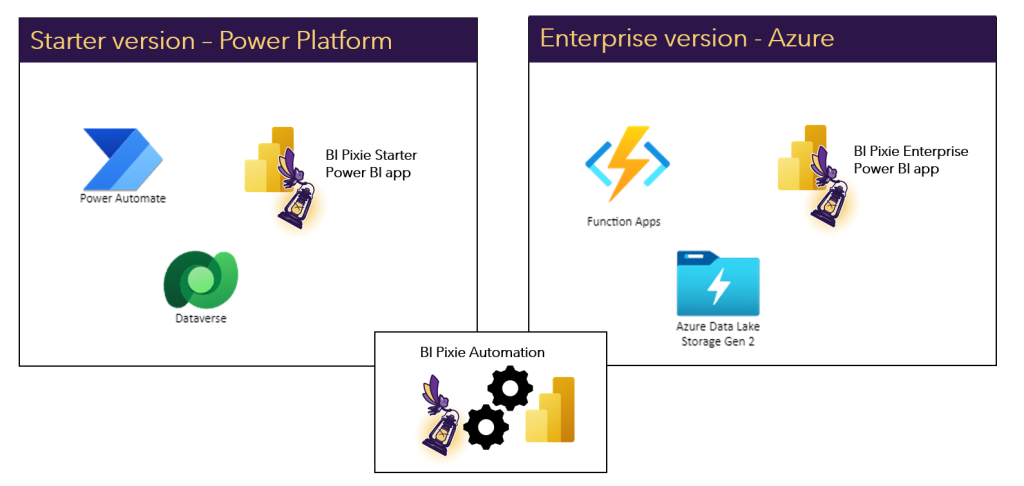
BI Pixie can be deployed on Power Platform or on Azure. We may refer to these two options as “deployment versions” and label them as the “Starter version” for Power Platform and the “Enterprise version” for Azure. But to avoid confusions, when we refer to the Enterprise version in the context of deployment, the term “Enterprise” is not related to the Enterprise pricing tier. You can deploy BI Pixie on Azure in any pricing tier of BI Pixie (Starting in February 2025, we now refer to the two deployments as “Starter Deployment” and “Azure Deployment”).
In this article, you will learn how to deploy BI Pixie on Power Platform. But before you start, you should note that using the Power Platform deployment can only support features in the Standard and Professional tiers.
Importing the BI Pixie Power Platform solution file into your Power Platform environment will allow you to set up a serverless web service that collects events from your BI audience and stores them in a Dataverse table. It is the first step in the deployment since the other components of BI Pixie rely on it.
Before you start, get the BI Pixie Power Platform solution from Microsoft AppSource:
To import the solution file, you will need to have a Power Platform environment with permissions to import solutions and a Microsoft license to use the Dataverse connector. Read more about Power Platform plans and licenses here or consult with your Power Platform admin.
If you expect high usage in the Power BI reports you wish to track, it is recommended to select an environment that will not exceed Power Automate request limits and the Dataverse maximal storage size (Learn here about Power Platform request limits). If you have high-volume usage, you can deploy BI Pixie using the Enterprise version.
How to install the solution
Follow this section with the permissions to install solutions in your Power Platform environment.
- Go to BI Pixie Starter Deployment on Microsoft AppSource and select Free Trial.
- Sign in to your Microsoft account, and in the Confirm your details to continue, select Free trial.
- You will be redirected to Power Platform admin center and will need to login again.
- The Install BI Pixie Starter Deployment will appear on the right pane.
- In Select an environment drop-down, select the environment where you want to install BI Pixie.
- Read the legal terms and privacy statements and check the two “I agree” checkboxes.
- Select Install.
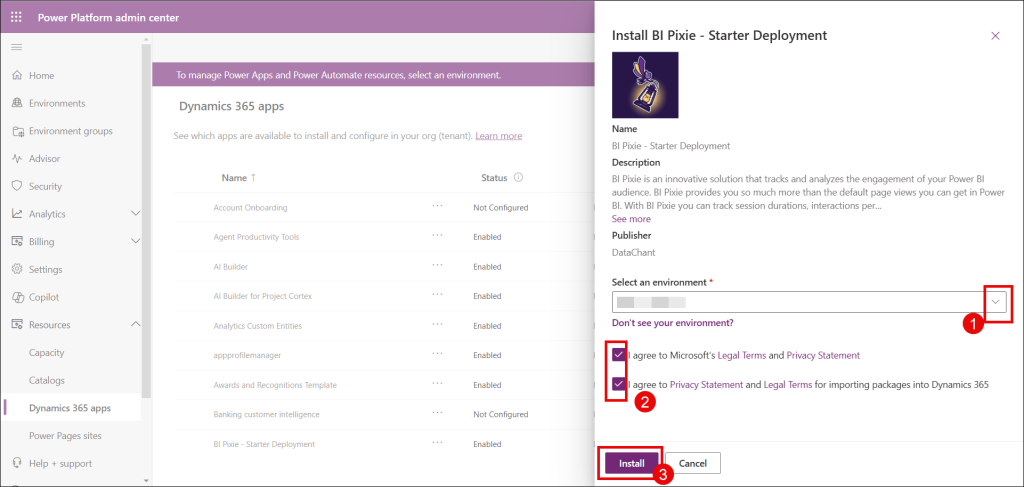
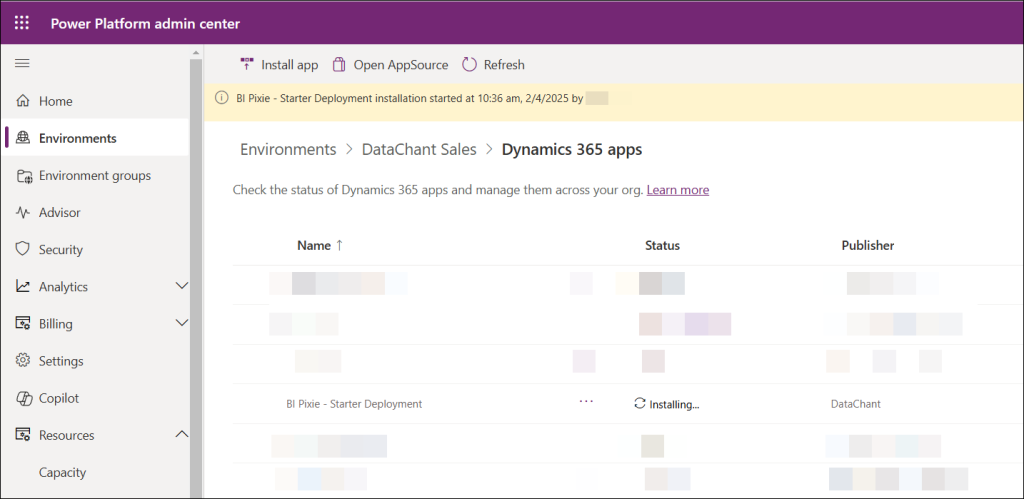
- The installation of BI Pixie will start, as shown in this screenshot and it can take about 5 minutes to complete.
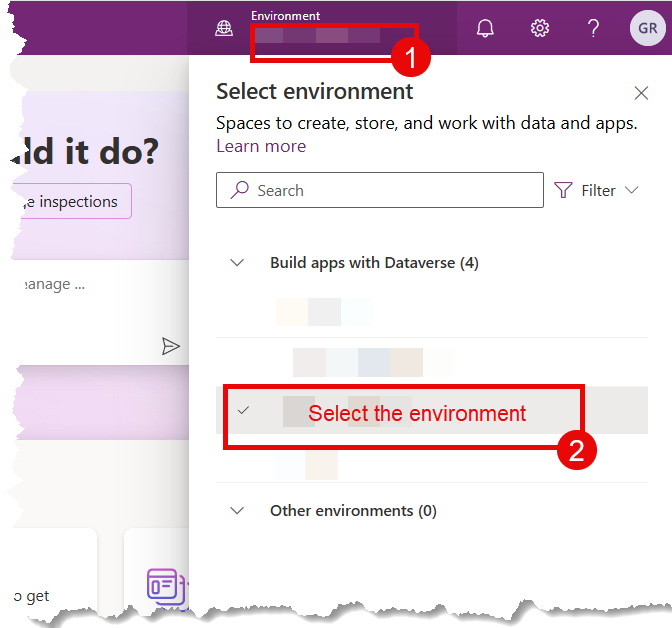
- When the installation is complete, go to Power Apps portal here, select the environment where you installed BI Pixie.
In the next steps, you to setup the connection of the solution to Dataverse.
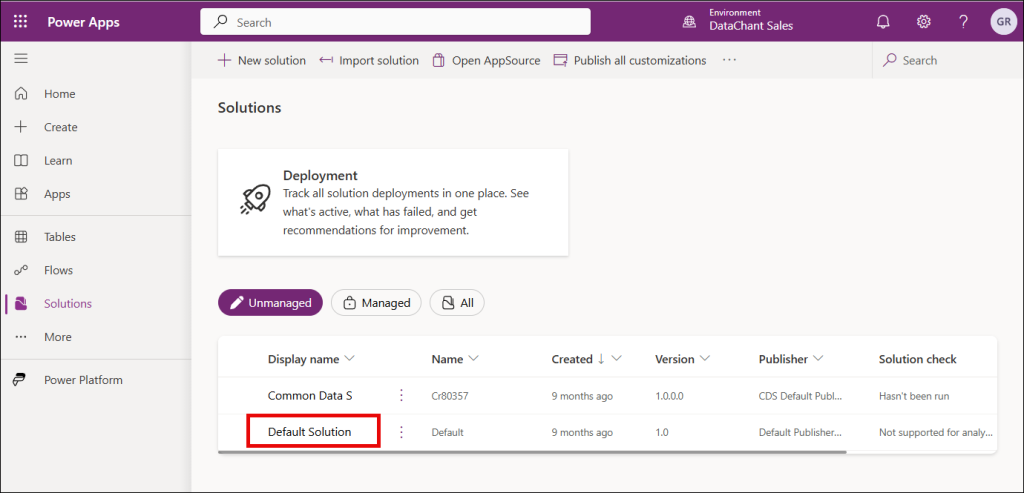
- In the left pane, select Solutions. In the Unmanaged table, select Default Solution.
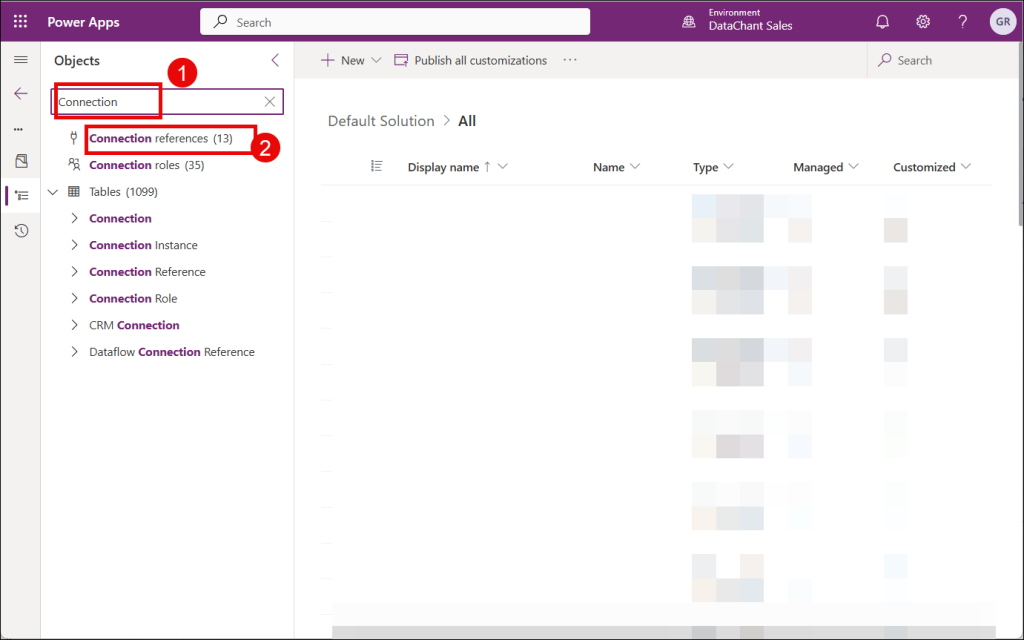
- In the Objects pane of Default Solution, enter Connection in the search box, and select Connection references.
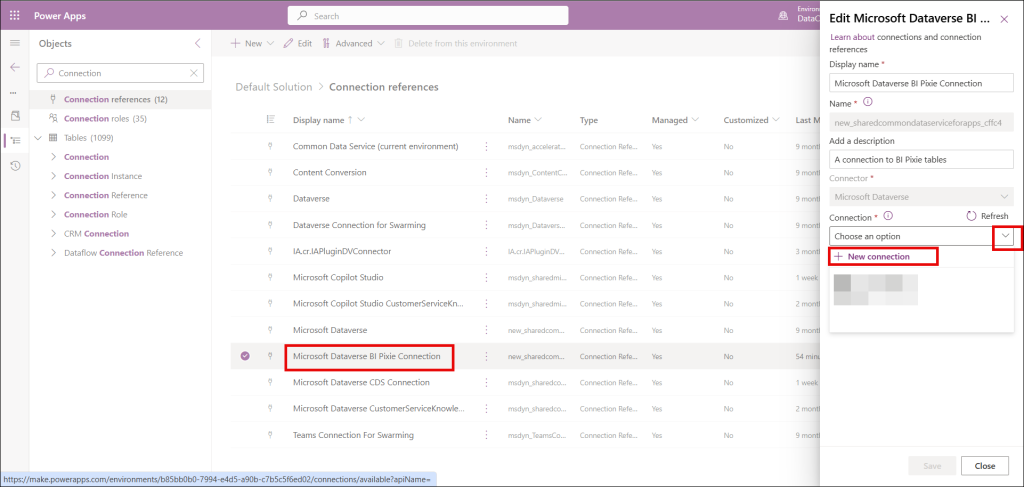
- In the Connection references table, scroll down and select Microsoft Dataverse BI Pixie Connection (Don’t use the search control, it will not find this item).
- In the Edit pane on the right, click the Connection drop-down, and select one of the existing Dataverse connections if you already have one, and click Save. Go to Step 13. If you don’t have existing connections in the drop-down, or choose to create a new one, click the + New connection below the Connections drop-down.
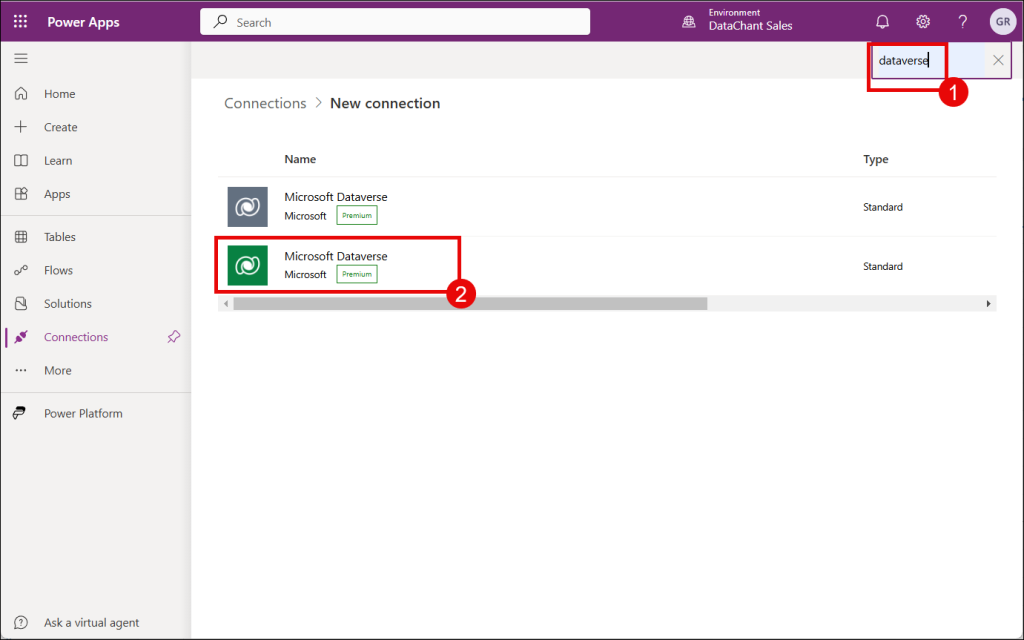
- Follow this step if you clicked the + New connection in the previous step. In the new tab in your browser with the New connection page. Use the search control at the top right corner to search for dataverse connections. Click the green Microsoft Dataverse item. In the Microsoft Dataverse popup page, select Create and log in using your Microsoft account. You will now see the Microsoft Dataverse connection with your email address. Go back to the previous browser tab.
- Follow this step if you clicked the + New connection in step 10. Go back to the tab you opened in step 10, and click the Refresh button next to Connection. Now in Connection the drop-down, you will see your email address as the connection that you have created previously.
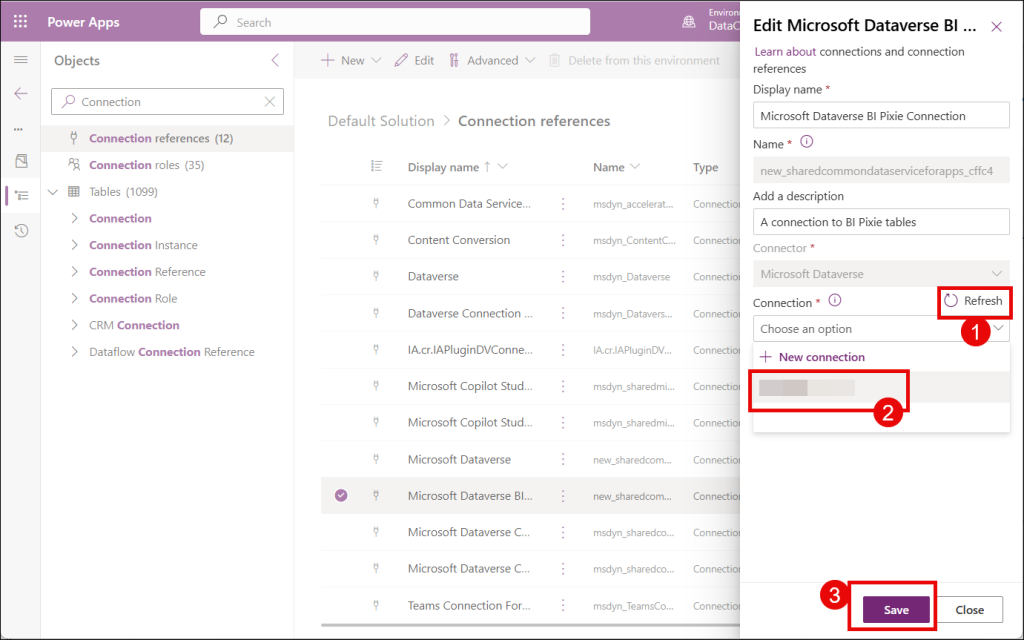
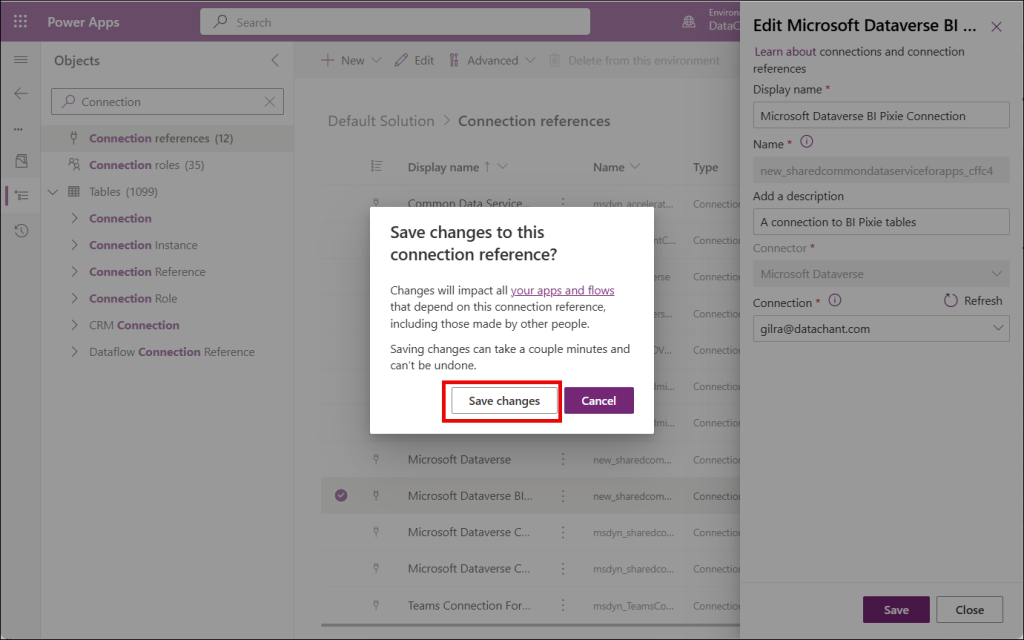
- Click Save changes in the prompt.
After you deploy the solution, you can find the following components when you open BI Pixie solution in the Solutions page under Managed or All.
- BI Pixie Web Trigger – A Power Automate cloud flow that intercepts the usage and engagement events from your Power BI instrumented reports.
- BI Pixie Web Trigger Inventory – A Power Automate cloud flow that intercepts the inventory updates from BI Pixie automation including the list of instrumented reports with stats about their pages and visuals.
- BI Pixie Events – A Dataverse table that is used to store all the intercepted events.
- BI Pixie Inventory – A Dataverse table that is used to store all the inventory information.
- BI Pixie Inventory Visuals – A Dataverse table that is used to store the inventory visuals for the Visual Clicks Heatmap.
Post-installation verification
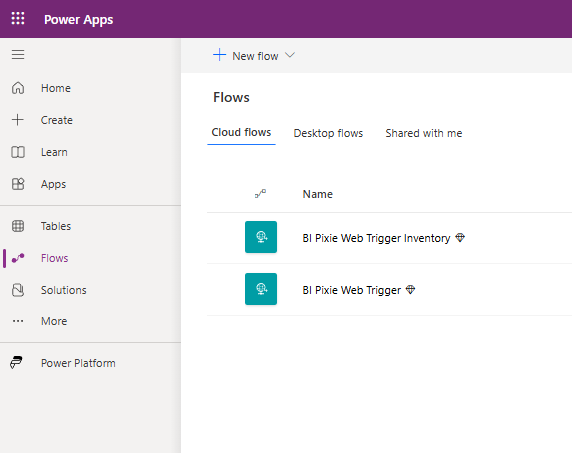
To verify that the installation of the solution was successful, go to Power Apps, and in the environments dropdown, select the environment you used to import the solution. In the left sidebar, select Flows and confirm you see BI Pixie Web Trigger and BI Pixie Web Trigger Inventory under the Cloud flows tab. You may have other cloud flows in your environment. You can use the search control and enter “BI Pixie” to find the the two cloud flows of BI Pixie.
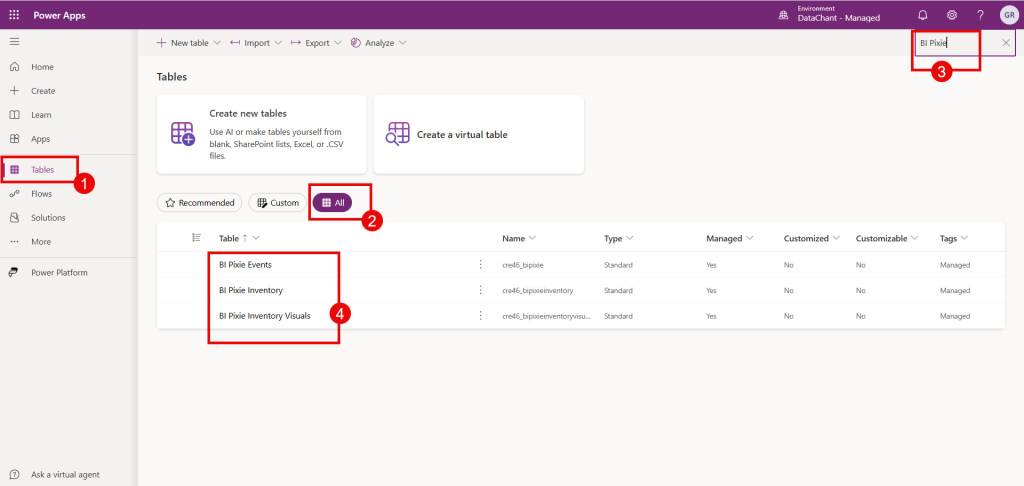
Select Tables on the left sidebar. Select All, and enter “BI Pixie” in the search bar. You will find the tables: BI Pixie Events, BI Pixie Inventory and BI Pixie Inventory Visuals.
Getting the web trigger URLs
In order to start collecting information from the pixies and analyze usage and engagement events from your Power BI reports, you will need to extract the web trigger URLs from each of the two BI Pixie Cloud Flows that you installed. These URLs are created by Microsoft during the import of the solution and are unique to you. Don’t share the URLs outside your organization.
The URLs are used by the web triggers in the cloud flows to collect the events from the pixies and the inventory information. In this section, you will learn how to extract the URLs. You will use these URLs in the configuration file of BI Pixie Automation that will described in the next article.
Go again to Power Apps, and in the environments dropdown, select the environment you used to import the solution. Select Flows in the left sidebar, and click the pencil icon of BI Pixie Web Trigger to edit the cloud flow.
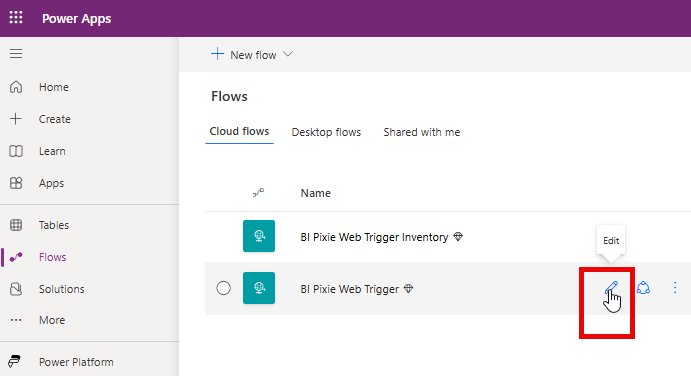
Note that BI Pixie Web Trigger is not editable.
Expand the first step “When a HTTP request is received” by clicking on it — as highlighted by bullet #1 in the screenshot below.
Click the copy icon of the HTTP GET URL as highlighted by bullet #2 in the screenshot below.
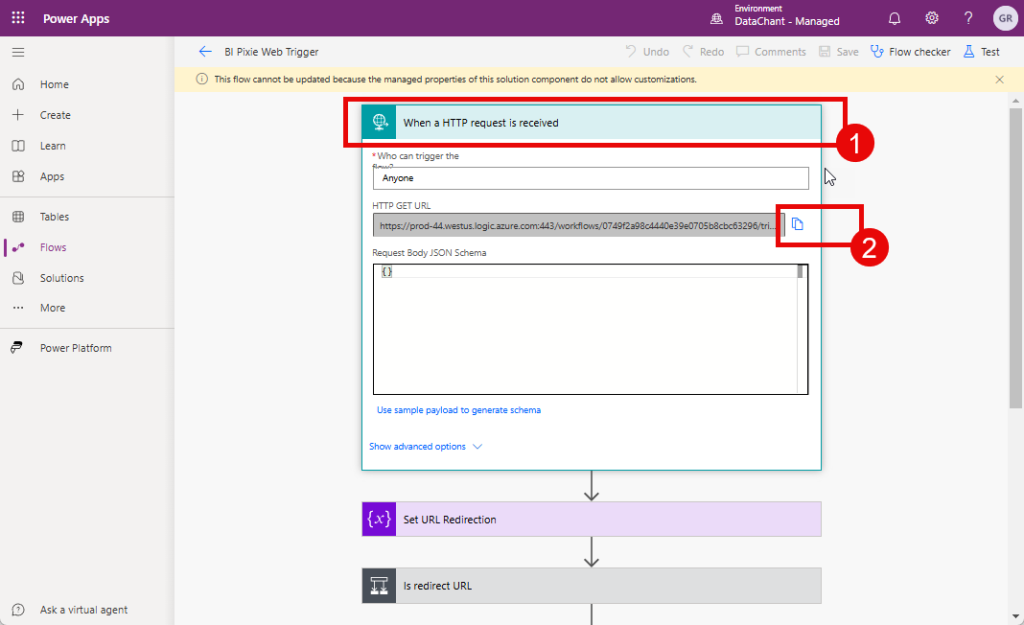
Paste the URL and save it; you will need it as the configuration value for pixies_flow_endpoint_url parameter of the automation’s configuration that will be explained in the next article.
Now, let’s get the URL from the second cloud flow. Select Flows in the left sidebar, and in Cloud flows tab click the pencil icon of BI Pixie Web Trigger Inventory to edit it.
Expand the first step “When a HTTP request is received” as highlighted by bullet #1 in the screenshot below.
Click the copy icon of the HTTP POST URL as highlighted by bullet #2 in the screenshot below.
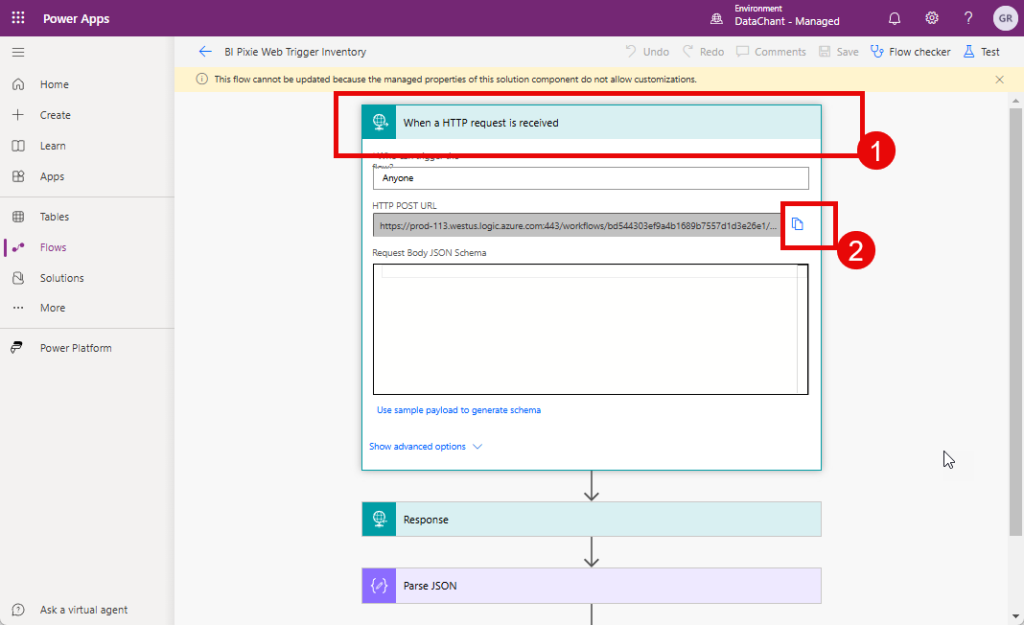
Paste the URL and save it; you will need it as the configuration value for pixies_inventory_flow_url parameter of the automation’s configuration that will be explained in the next article.