BI Pixie can instrument your target reports using three methods, and in this article we will focus on the second method below:
- Manually or externally: You bring your reports and semantic models locally, then you run BI Pixie Instrumentation using the target folder. This method is documented here.
- Using Git: You connect BI Pixie Instrumentation with your Git or GitHub repository. BI Pixie Instrumentation will pull the definitions of your reports and semantic models and can even commit and push the instrumented items in the repository and the Power BI workspaces that are integrated with Git.
- Via Microsoft Fabric API: You tell BI Pixie which workspaces and reports to use. BI Pixie will load the definitions of the reports and semantic models (Using Get Item Definition API call) and will store the files locally. Then, BI Pixie will instrument the reports and semantic models and update the report definitions in their corresponding workspaces. This method is documented here.
In this article, you learn how to instrument your reports using the 2nd method.
BI Pixie can be integrated into your existing report deployment processes. If you already use Git in Azure DevOps, or GitHub as your source control tool for your reports, you can avoid the need to manually import Power BI project files to BI Pixie Instrumentation, or user external scripts to bring the report definitions for instrumentation. You can even avoid the need to manually publish the instrumented reports back to Power BI service.
In this article, you will learn how to integrate BI Pixie with your Git and include the instrumentation of the pixies in your application lifecycle process or CICD.
When you complete the setup of BI Pixie Instrumentation, BI Pixie can perform the following steps:
- Pull the definition files of your reports and semantic models from your Git/Github repository
- Commit and Push the instrumented definitions back to your repository
- If you integrate the repository with Power BI workspaces, BI Pixie can send an update request, and the workspaces will fetch the changes from your repository on Git/Github.
If you prefer to pull the definitions (Step 1) without committing the changes, you can disable Steps 2 and 3. The instrumented reports will be available in the local Git folder, and you can import the files manually or using external scripts. If you prefer to commit and push the changes to the repository, without updating the workspace, you can disabled the 3rd step.
BI Pixie supports two modes of integration with Git –
- Workspace Git-integration: You use Power BI/Fabric workspace Git-integration (as explained by Microsoft here). In this scenario, you can use a a Git repository in Azure DevOps, GitHub and GitHub Enterprise and connect it to multiple workspaces in Power BI.
- Git-only (Without Step 3): You use Git outside the workspace integration, and made sure that in your Git repository the Power BI reports are converted as Power BI project files.
The following table summarizes how BI Pixie can integrate with Git in the two modes:
| Mode/Features | Workspace Git-integration | Git-only |
| BI Pixie can use Git to pull the files from their repository and store them in the target folder before the instrumentation begins | Supported (No need to convert Power BI reports to project files) | Supported, but you need to ensure that the files are stored as Power BI projects |
| BI Pixie can use Git to commit the changes and push back the instrumented reports | Supported | Supported |
| If the Power BI reports are stored in multiple folders in the same repository, BI Pixie can report the folders as the project field in the events | Supported | Supported |
| BI Pixie can sync the committed reports in their workspaces | Supported. Requires to label each Git folder as the workspace name | Not applicable without workspace Git-integration. You can publish the instrumented reports using web rest APIs |
To instrument your reports using Git make sure that you install Git for Windows in the computer where 'bi-pixie.exe' runs. There is no need to bring Power BI project files to the target folder. BI Pixie will do it for you.
If you run 'bi-pixie.exe' for the first time from a target folder, it will create the configuration file 'bi_pixie_config.json'. Add the mandatory fields (as described in this article):
- project_name
- subscription_email
- license_key
- pixies_flow_endpoint_url
If your Git repository groups multiple reports in folders, set the following field to true.
"use_report_folder_as_project": true,
BI Pixie will assign the folder name of each report as the project field in all the events that the pixies will collect.
With this method, you can define the workspace names as the Git folder and report the actual workspaces in the collected events.
Find the "git_settings" section and set "git_enabled" to true as shown below:
"git_settings" : {
  "git_enabled": true,
  ...
},
Next, find the URL of your Git repository and enter it as the value of "git_url", as shown below.
"git_settings" : {
  "git_enabled": true,
  "git_url": "https://...",
  ...
},
If you use Git in Azure DevOps, the Git URL has the following format:
"https://[your-domain]visualstudio.com/[project]/_git/[Repository name]"
If you use GitHub, the URL has the following format:
"https://github.com/[Username]/[Repository].git"
Next, enter the username of your Git repository or your Github account name in "git_username" field, and enter the password of your Git repository or the personal access token of your Github account.
"git_settings" : {
  "git_enabled": true,
  "git_url": "https://...",
  "git_username": "[Git username]",
  "git_password_or_key": "[Git password or Github personal access token]"
  ...
},
If you don't want to allow BI Pixie to commit the changes, you can keep the rest of the fields as-is.
Run bi-pixie.exe. It will create the folder 'BI Pixie Repository' under the target folder and will clone your Git repository there. Further runs of bi-pixie.exe will allow it to pull the files from the repository into that folder.
When the BI Pixie Instrumentation ends, the pixies will be added to the files. You can review the changes and commit them manually. If you wish to include the commit and push operations in BI Pixie Instrumentation, follow the next step.
Under "git_settings", find "git_commit_changes" and set it to true. By default the commit message is "BI Pixie instrumentation". You can change it to a different name by entering the message in the "git_commit_message" field.
The git_settings will be formatted as follows:
"git_settings" : {
  "git_enabled": true,
  "git_url": "https://...",
  "git_username": "[Git username]",
  "git_password_or_key": "[Git password or Github personal access token]"
  "git_commit_changes": true,
  "git_commit_message": "BI Pixie instrumentation",
  "git_sync_changes_to_workspaces": false
},
Finally, if you your Power BI/Fabric workspaces are connected to Git (In the Workspace Git-integrated mode that was mentioned above), you can take BI Pixie integration one step further and sync the committed changes back to the workspaces.
To sync the changes to the workspaces, BI Pixie will need to know how to associate the Git folders to workspaces. In order to do it, you will need to set the Git folders in each workspace as the workspace name.
To sync the changes to the workspace, BI Pixie uses Microsoft API call that is documented here. The call requires you to log in first as a user. For that reason, you will need to install Azure CLI for Windows on the machine where you run 'bi-pixie.exe' and have a Power BI administrator log-in using "az login".
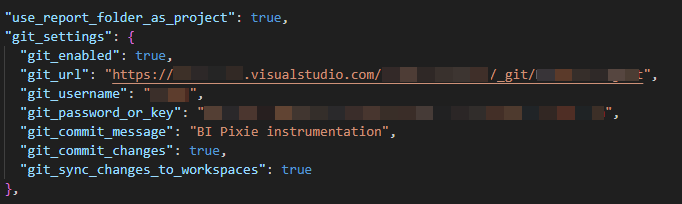
In "git_settings", set "git_sync_changes_to_workspaces" as true, and make sure that "use_report_folder_as_project" is set to true.
"use_report_folder_as_project": true,
"git_settings" : {
  "git_enabled": true,
  "git_url": "https://...",
  "git_username": "[Git username]",
  "git_password_or_key": "[Git password or Github personal access token]"
  "git_commit_changes": true,
  "git_commit_message": "BI Pixie instrumentation",
  "git_sync_changes_to_workspaces": true
},