Connect AI Assistants (MCP Server)
The BI Pixie MCP Server lets AI assistants (such as Claude, GitHub Copilot, Codex, Microsoft Fabric data agents, and Azure AI Foundry) answer questions about how your Power BI reports are actually used, in plain language. It connects to the BI Pixie semantic model in your Fabric workspace and returns numbers that match your BI Pixie Dashboard exactly. It is strictly read-only: it can never change, delete, or refresh your data.
BI Pixie runs natively inside Microsoft Fabric as a BI Pixie item. The MCP Server is a separate tool that you register with your AI assistant. It reaches your engagement data by querying the BI Pixie semantic model that lives in the same Fabric workspace where you installed the dashboard, using your own Fabric and Power BI identity.
What is MCP?
The Model Context Protocol (MCP) is an open standard for connecting AI assistants to tools and data. The BI Pixie MCP Server is one such tool: once you register it with your AI assistant, you can ask usage questions in chat and the assistant pulls the answers straight from your BI Pixie data. No DAX, no exports.
Two ways to run it
You can run the MCP server two ways. Almost everyone starts with the local install, then deploys the remote option to run it in production for AI agents and teams.
- Local (start here). Install it on your own machine and sign in with your Fabric and Power BI identity. You are asking questions within minutes, with no service principal and no admin setup beyond one tenant setting. This guide walks you through it below.
- Remote (run it in production). Host the server as a secure, always-on endpoint so AI agents in production workflows can query usage data on their own, and so Microsoft Fabric data agents, Azure AI Foundry, and your team can reach it with no local install. Your IT or Azure team deploys it. See the Hosted option section below.
Ground your data agent in real human usage
When a data agent turns a question into DAX against a mission-critical model, it has to guess which column and which value the user means. Point it at the BI Pixie MCP server first: audit_overview (with group_by="column") ranks columns by how often people actually select and filter them, and audit_column_values returns a column's most-selected values, so the agent picks the column and the values real users rely on instead of guessing. This is the kind of grounding you want in a hosted, always-on deployment where agents run on their own. These tools count BI Pixie's captured data-selection events (slicer, filter, cross-filter, and drill selections), not raw clicks on individual visuals, and every result carries a freshness footer.
What you can ask
Once connected, ask your assistant questions like:
- "Which of my reports are used the most? Which are unused and could be retired?"
- "How many monthly and daily active users do I have, and what's my stickiness (DAU/MAU)?"
- "Which pages in the Executive Dashboard get the most clicks and time spent?"
- "What's my CSAT and NPS, and which reports are dragging satisfaction down?"
- "How has adoption trended over the last 90 days?"
- "How much time savings and financial benefit have users reported in surveys?"
- "Users keep asking about 'region'. Which audited column do people actually filter on most, so my agent groups by the right one?" (resolves the name, then ranks columns by real selection activity)
- "Before I write the DAX, what are the most-selected values of the Country column, the ones people deliberately click, so I can default my filter to them?" (ranks the column's values by what people actually select)
Tip: ask your assistant to "suggest questions". The server ships a built-in menu of example questions grouped by topic, so you can explore what's available.
Before you start
- An active BI Pixie license and a deployed BI Pixie semantic model. This is the same model behind your BI Pixie Dashboard, installed in your Fabric workspace when you set up the dashboard.
- Python 3.12 or later on your machine.
- The Azure CLI, for the simplest sign-in (
az login). - One Power BI admin setting: "Dataset Execute Queries REST API" enabled (Power BI Admin portal > Tenant settings > Integration settings). This is the single most common setup blocker for the local install. If it's off, queries fail with a permission error. No service principal and no "Allow service principals to use Power BI APIs" toggle are needed for the local path.
- Normal Power BI workspace access for your signed-in account (Viewer, Member, or whatever the model needs), granted the usual way in Manage access on the Fabric workspace. This is standard per-user access, not a service-principal enrollment.
- Three values that identify your data: your Microsoft Entra tenant, the Fabric workspace that holds the BI Pixie model, and the model name (
BI Pixie). You can use the workspace's display name instead of its GUID.
Step 1: Install
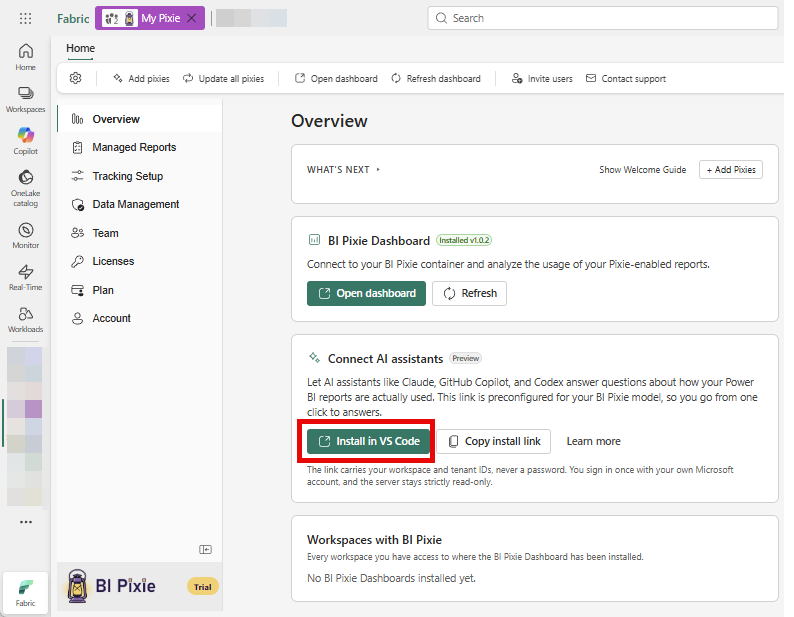
Already running BI Pixie? Install in one click from your Overview
If you have set up the BI Pixie Dashboard, the fastest way to connect is from inside Microsoft Fabric: open your BI Pixie item, go to the Overview page, and click Install in VS Code on the Connect AI assistants card. That link is already filled in with your Fabric workspace, so you can skip the manual configuration in Step 2. You still need Python (Step 1) and a one-time az login. Prefer to configure by hand? Follow the steps below.
Install from PyPI. No download or clone required.
# Zero-install runner (recommended), always fetches the latest version:
uvx bipixie-mcp

# Or install into your current Python environment:
pip install bipixie-mcp
First run walks you through it
Run uvx bipixie-mcp in a terminal with no settings yet and it starts a short guided setup: it signs you in (reusing az login when available), lists the workspaces you can access, flags your BI Pixie models, lets you pick one from a numbered menu, runs a quick test query to confirm it works, and saves a .env you can reuse. Re-run it any time with uvx bipixie-mcp setup. Prefer to configure by hand? Skip ahead to Step 2. (When your AI assistant launches the server it never prompts — it reads the settings below.)
Using VS Code? Register it in one click, then add your settings in Step 2:
Step 2: Configure
The server reads its settings from environment variables (or from your AI assistant's MCP config). Point the workspace and dataset at the Fabric workspace where you installed the dashboard and at the BI Pixie model inside it. The simplest setup uses your existing Azure CLI sign-in, with no app registration and no secret. Create a .env file with these four values:
BIPIXIE_MCP_TENANT_ID=<your-entra-tenant-guid>
BIPIXIE_MCP_WORKSPACE_NAME=<Fabric workspace that holds the BI Pixie model>
BIPIXIE_MCP_DATASET_NAME=BI Pixie
BIPIXIE_MCP_AUTH_MODE=azure_cli
Then sign in once. The server reuses that session for every query:
az loginTip: find your tenant GUID with az account show --query tenantId -o tsv. Prefer to use GUIDs? Set BIPIXIE_MCP_WORKSPACE_ID instead of the workspace name.
No need to hunt for IDs. The settings above use display names, so you do not have to copy GUIDs from the Fabric or Power BI portal. After the server connects, you can ask your assistant to list your Fabric workspaces and BI Pixie models and pick one, then switch between them at any time.
Don't use the Azure CLI?
Set BIPIXIE_MCP_AUTH_MODE=device_code instead. The first time you use the server it prints a short sign-in code to paste into your browser. Either way, the server runs as you. There is no separate BI Pixie sign-in step: Microsoft Fabric and Power BI provide your identity automatically, and the server can only reach data you already have access to in Power BI. Neither local mode needs a service principal.
Step 3: Register with your assistant
Claude Code, Claude Desktop, or Cursor
Add the server to your project's .mcp.json:
{
  "mcpServers": {
    "bipixie": {
      "command": "uvx",
      "args": ["bipixie-mcp"],
      "env": {
        "BIPIXIE_MCP_TENANT_ID": "<your-entra-tenant-guid>",
        "BIPIXIE_MCP_WORKSPACE_NAME": "<your-fabric-workspace-name>",
        "BIPIXIE_MCP_DATASET_NAME": "BI Pixie",
        "BIPIXIE_MCP_AUTH_MODE": "azure_cli"
      }
    }
  }
}
VS Code
Click Install in VS Code above, then add the same env block to .vscode/mcp.json so the server knows which Fabric workspace and model to query.
Restart your assistant. Ask "describe the BI Pixie model" to confirm the connection. You should see your tables, measures, and the data's freshness date.
Switch workspaces while you chat
If you manage BI Pixie items across several Fabric workspaces, you don't need to reconfigure to move between them. On the local install, just ask:
- "List my Power BI workspaces."
- "List the datasets in <workspace>." (BI Pixie models are flagged for you.)
- "Use the BI Pixie model in <workspace>."
The switch lasts for the session and resets when you restart. You only ever see Fabric workspaces and models your own Power BI account can already access. (This applies to the local install; a hosted deployment stays pinned to one model.)
Privacy & security
- Read-only. The server can only run read queries. It can never change, delete, or refresh your data, and write commands are rejected before they reach Power BI.
- Runs as you. It uses your own Microsoft Fabric and Power BI identity, so it can only reach data you're already permitted to see. There is no separate BI Pixie sign-in.
- No personal data by default. User names and IP addresses are stripped from every result unless an administrator explicitly enables them after a privacy review.
- Numbers you can trust. Answers come from the same validated measures as your BI Pixie Dashboard, because both read the same semantic model in your Fabric workspace, so they match. Every answer is stamped with how fresh the data is (the most recent refresh date).
Hosted option (Fabric data agents & Azure AI Foundry)
The same server can run hosted in your Azure environment as a secure, always-on endpoint, so AI agents in production workflows can query usage data on their own, and so Microsoft Fabric data agents, Azure AI Foundry, and your team can reach it without anyone installing anything locally. Unlike the local install, the hosted path runs under a non-user identity, so it uses a service principal or an Azure managed identity instead of your personal sign-in:
- The tenant setting "Allow service principals to use Power BI APIs" (Tenant settings > Developer settings) must be on. This gates only the hosted modes, never the local user-identity install.
- The service principal or managed identity is added as a Member (or Admin) of the Fabric workspace, which gives it Read and Build on the BI Pixie model.
- Managed identity is preferred when hosted: it needs no app registration and no secret. The Azure-assigned identity resolves automatically, and only needs the workspace Member role.
- Service principal is the alternative: a confidential-client app registration with
Dataset.Read.Allas an application permission, admin consent, and a client secret stored as a Key Vault reference.
This is an enterprise setup. Contact support to plan it.
Troubleshooting
- Queries fail with a permission error (403): the "Dataset Execute Queries REST API" tenant setting is off, or your account isn't a Member of the Fabric workspace. Ask your Power BI admin to enable the setting and confirm your workspace access in Manage access.
- "Workspace or dataset not found": check the Fabric workspace name and confirm the model is named
BI Pixie(or setBIPIXIE_MCP_DATASET_NAMEto your model's actual name). - Wrong data or empty results: confirm
BIPIXIE_MCP_TENANT_IDmatches the tenant where your Fabric workspace lives.
Related Resources
- BI Pixie Semantic Model, the tables and measures the assistant queries, plus the OneLake and Power BI paths to the data.
- BI Pixie Metrics, what each measure means.
- BI Pixie Dashboard, a walkthrough of every dashboard page.
- Set up BI Pixie Dashboard, install the semantic model that the MCP Server connects to.
- OneLake Integration, consume the same telemetry through OneLake shortcuts.
- bipixie-mcp on PyPI, the full technical reference: every setting, all sign-in modes, the complete tool catalog, and hosted deployment.
- Contact Support, get help with setup.