
Rate and validate AI answers
With ratings and validation in AI apps, the domain experts your organization names as validators validate answers from Claude and Microsoft Copilot, and your BI team learns how satisfied decision makers and stakeholders are with each answer. A BI Pixie card comes with each answer, with a rating in one tap, an optional comment, and Validate this, which starts a validation in BI Pixie. Your BI team reads the ratings and the validations in the BI Pixie dashboards, for each semantic model.
Ratings and validation are off until an administrator of your BI Pixie account turns them on. Each section of this page is written for one person:
- An administrator of your BI Pixie account turns on ratings and validation.
- Anyone who asks a question rates an answer and asks for validation.
- A validator answers a validation request.
- Your BI team reads the results in the dashboards.
Prerequisites
- BI Pixie in Claude, through the BI Pixie connector, or BI Pixie in Microsoft Copilot. See Use BI Pixie in Claude and Use BI Pixie in Copilot.
- To turn on ratings and validation, the administrator role in your BI Pixie account.
- To answer a validation request, the administrator role, or to be named a validator by an administrator. To see live rows, access to the semantic model the request names.
- To read the results, the AI Readiness Dashboard or the BI Pixie Dashboard installed in a Fabric workspace you can open.
Turn on ratings and validation
One setting turns on both the ratings and the validation requests, for everyone in your BI Pixie account.
- In your BI Pixie item, open the Account view, and select the AI tab.
- Under AI apps, select Ratings and validation in AI apps.
- Under Rating scale, choose Thumbs up/down, Smile/frown or Stars. Preview shows the options people see on the card.
- Optionally, name validators. Under Validators, enter the email address of a member of your BI Pixie account in Email of the new validator, and select Add validator.
- Optionally, change the limits and the response time. See Limits and response time.
- Select Save.
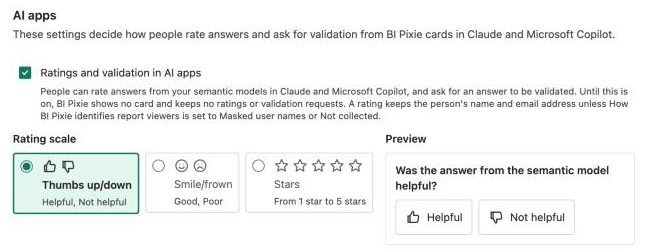
The AI tab appears only to administrators, and only while AI features is on for your account.
Rating scale
- Thumbs up/down offers Helpful and Not helpful. It is the default.
- Smile/frown offers Good and Poor.
- Stars offers 1 star to 5 stars.
Everyone in your account rates on the scale you choose, so the satisfaction scores compare like with like. If you change the scale later, ratings already given keep their values.
Validators
- Validators answer validation requests beside your BI Pixie account admins. A validator must be a member of your BI Pixie account.
- With no validator named, validation requests go to your BI Pixie account admins.
- To remove a validator, select Remove followed by the validator's name, and then Save. The validator's open requests move to the account admins, and the Validation inbox says how many moved.
Limits and response time
- Open validation requests per person sets how many requests each person can have waiting at once. The default is 5.
- Validation requests per person each day sets how many requests each person can send a day. The default is 10.
- Both limits offer No limit.
- Response time for validation requests is Off by default. Choose 1, 2, 3 or 5 business days, and BI Pixie marks a request overdue once the time passes without an answer, and sends one reminder email to whoever has to answer it.
Rate an answer
Once ratings are on, each answer that Claude or Copilot gives from a semantic model through BI Pixie carries one BI Pixie card. In Claude, the card sits under the answer. In Copilot, the card sits above the answer. The card reads Rate this answer, with your account's rating options and Validate this.
- Read the answer, and then select an option on the card, such as Helpful or Not helpful. The card shows a check and "Thanks" at once.
- Optionally, select Add a comment, type up to 500 characters in Comment (optional), and select Save comment. The card says "Your comment is saved with your rating."
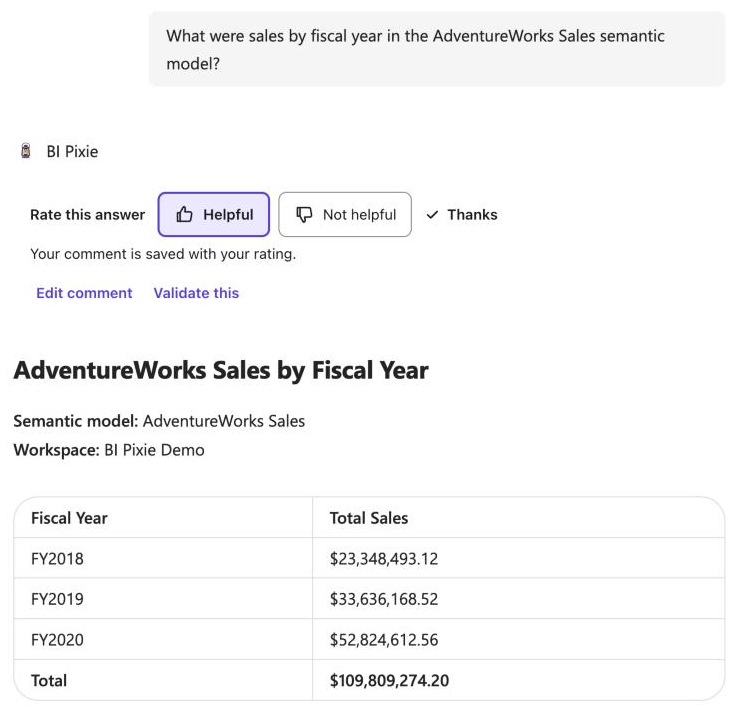
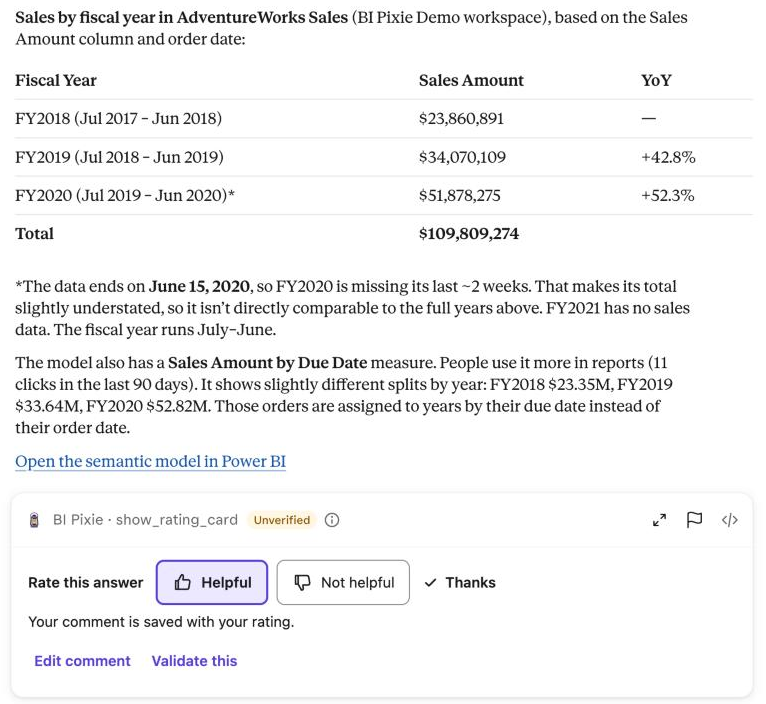
- To change your rating, select another option. BI Pixie replaces your earlier rating and keeps your comment. To change the comment, select Edit comment.
- When you open the card again later, it shows the option you chose and the date you rated the answer.
- In Copilot, Copilot can ask you to confirm before BI Pixie saves a rating. Confirm it, and the card saves the rating.
- If the rating cannot be saved, the card clears your choice and says so. Select Try again.
Who can read your rating and comment
Beside the comment box, the card says who can read your ratings and comments, and whether they see your name. Your BI Pixie account admins can read every rating and comment, and the people who can open your account's BI Pixie dashboards see them there. BI Pixie keeps each comment exactly as you type it, so leave figures and personal details out of it. For when a rating keeps your name, see Names on ratings and requests.
Ask for validation
When an answer looks wrong, you can have it validated by a domain expert your organization named as a validator. BI Pixie shows you exactly what it sends, and to whom, before it sends anything.
- On the card, select Validate this. In Claude, the Ask for validation screen opens in a panel beside the conversation. In Copilot, BI Pixie's Ask for validation page opens in your browser. Sign in to BI Pixie if it asks you to.
- In To, choose Your BI Pixie account admins or a validator your administrator named.
- Check Question and Answer you saw. BI Pixie fills the question when the AI app passed it to BI Pixie, and fills the answer with the rows BI Pixie returned. Edit either box, or paste the question and the answer as they appeared in the chat. The validator reads both exactly as they appear in the boxes.
- Under What BI Pixie ran, select Show query to see the DAX query that goes with the request.
- Optionally, add a note of up to 500 characters in Your note (optional).
- Read What is sent, and then select Send request.
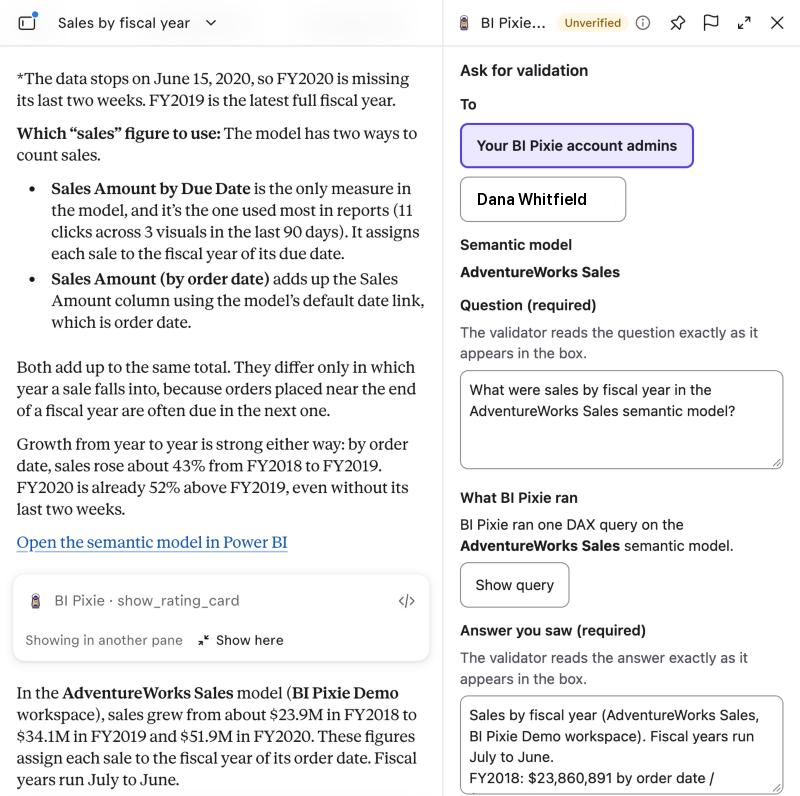
BI Pixie says whom the request went to and offers Check status, which opens My validation requests. The person who answers receives an email that says a request is waiting, without the question or the answer.
- A validation request always carries your name, so the validator knows whom to answer.
- An answer can have one open validation request. Selecting Validate this again says the request is already open.
- In Copilot, the Ask for validation page opens only for the person who asked the question, and only for 24 hours after the answer.
Follow your validation request
- In your BI Pixie item, select AI Validation, and then My validation requests.
- Select a request to see its question, the answer you saw, your note, and the validator's correction, reason or question.
- While the request waits, you can select Withdraw. When the validator asks you a question, select Reply, type in Your reply, and select Send reply.
Each request shows its status: Waiting, Question asked, Approved, Corrected, Declined, Expired or Withdrawn, with who answered and when. A request past the response time your administrators set is marked Overdue. BI Pixie emails you when a validator answers or asks a question.
Answer a validation request
Validation requests reach your BI Pixie account admins and the validators an administrator named. When a request reaches you, BI Pixie sends you an email with an Open the Validation inbox button.
- In your BI Pixie item, select AI Validation, and then Validation inbox.
- On Open, each request shows its question, its semantic model, who sent it and when. Select a request.
- Read Question, Answer the analyst saw and Note. Under What BI Pixie ran, select Show query to read the DAX query.
- To check the answer against your data, select Show live rows. BI Pixie runs the query under your own access and shows up to the first 500 rows. BI Pixie keeps none of them.
- Choose an answer:
- Approve confirms the answer.
- Correct: write the right answer in Correction, and select Send correction.
- Decline: write a Reason, or select Use the reason "I do not have access to the semantic model.", and then select Decline the validation request.
- Ask a question: write Your question, and select Send question. The request waits for the sender's reply.
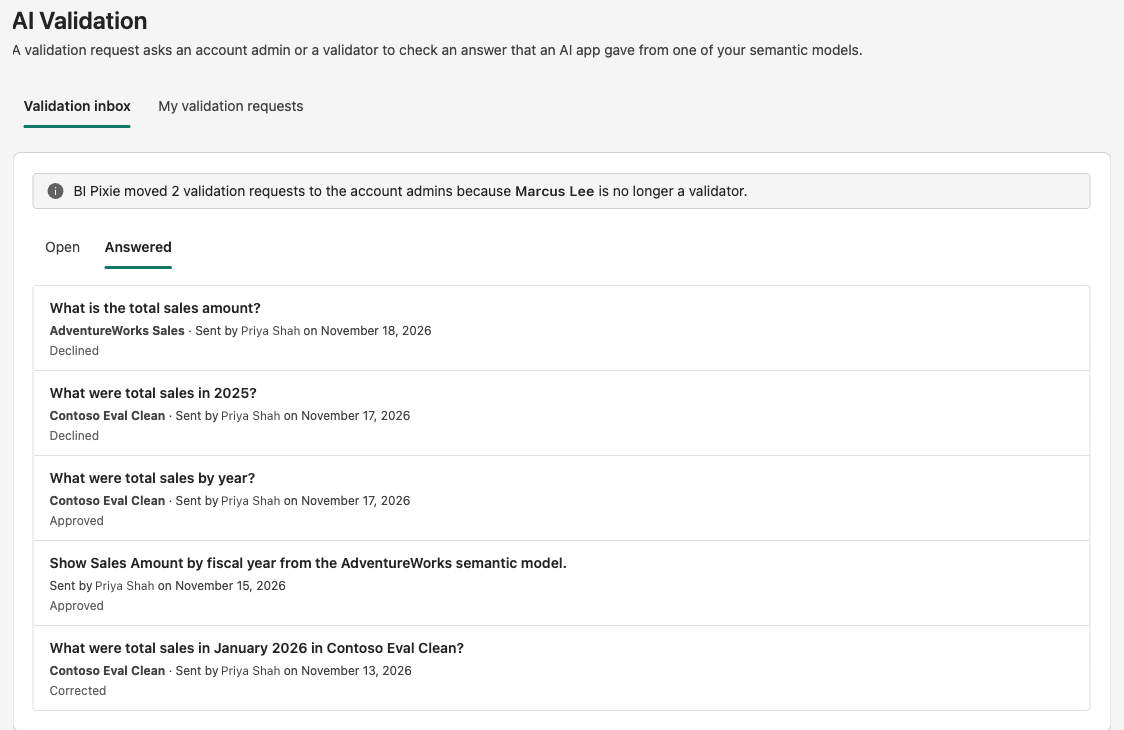
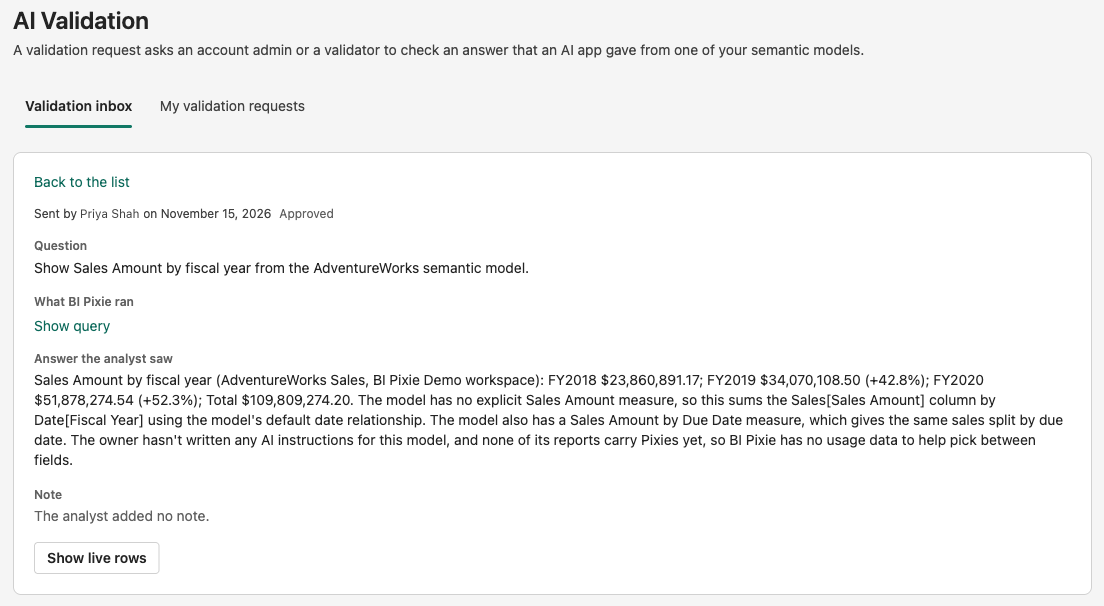
An answered request moves to Answered, and the sender sees your answer in My validation requests.
- When a request names you, Stop requests from followed by the sender's name sends that person's new requests to your BI Pixie account admins instead. It takes one selection and cannot be undone.
- A request the sender withdrew can no longer be answered.
- You can answer a request you sent yourself, when it reaches your Validation inbox.
Read the results
Ratings and validation requests reach your dashboards with each dashboard refresh. Satisfaction (CSAT) is the share of satisfied ratings among all ratings. Helpful, Good, 4 stars and 5 stars count as satisfied, and every rating counts in the total, 3 stars included.
In the AI Readiness Dashboard
- Feedback on AI shows how satisfied people are with AI answers for each semantic model and each AI app: CSAT from AI apps, the ratings, the comments and the semantic models rated, ratings by choice and over time, satisfaction beside each semantic model's readiness score and benchmark accuracy, and the comments.
- Validations shows the requests waiting, the answers confirmed and corrected, the median response time in business days, the verdicts over time, and the requests by semantic model. It never shows a question, an answer or a correction. Each corrected answer has a link that opens the request in BI Pixie, where only the people on the request can read it.
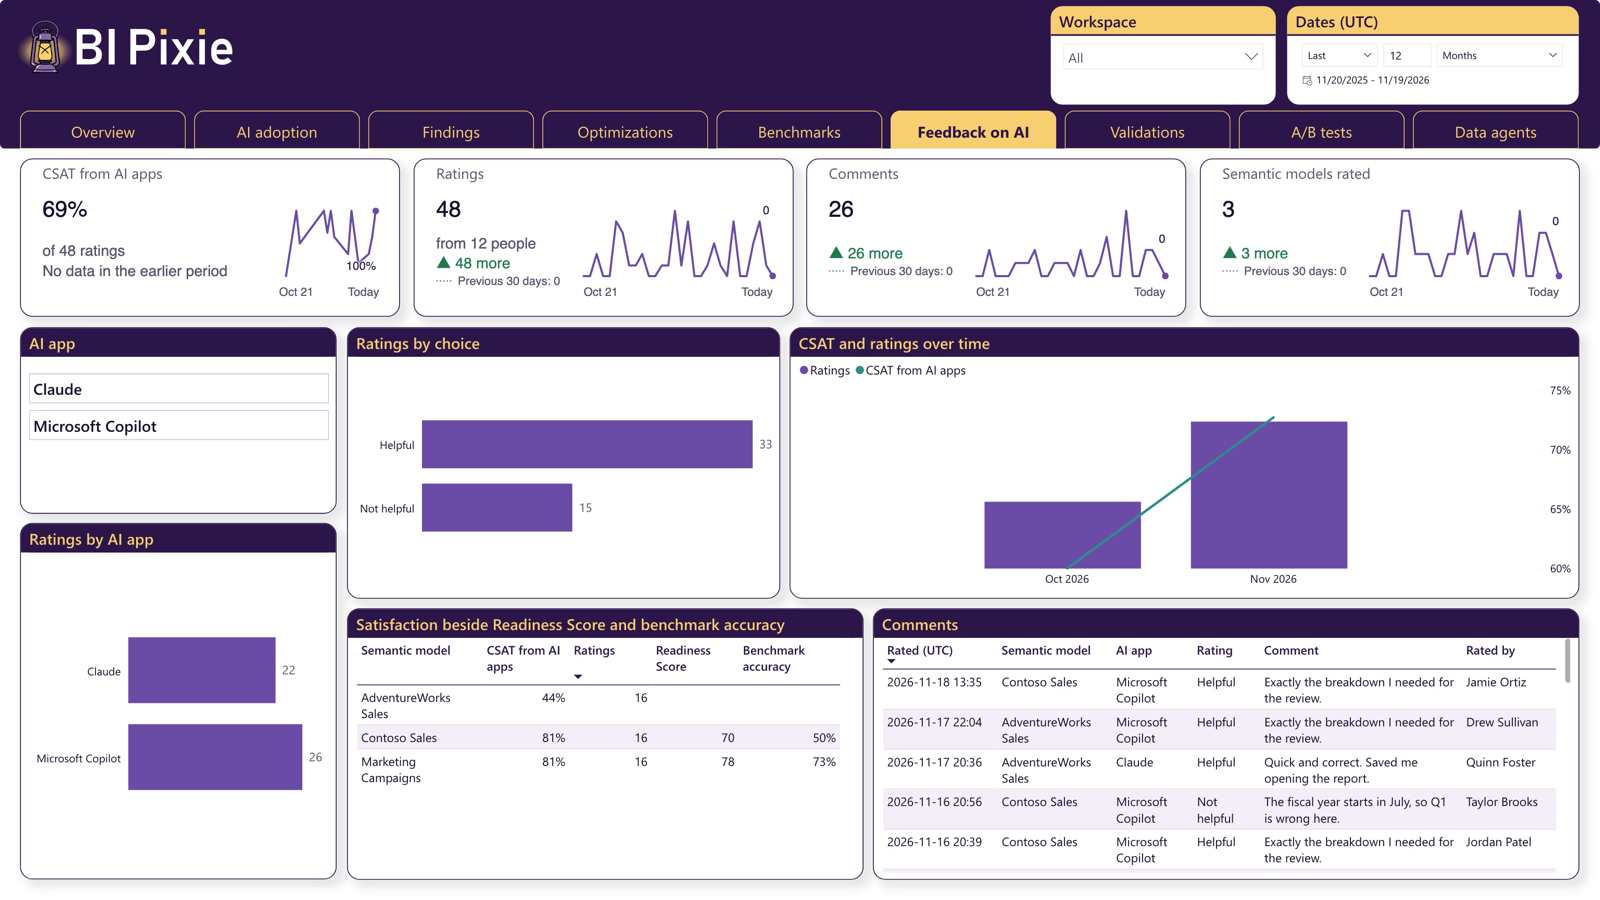
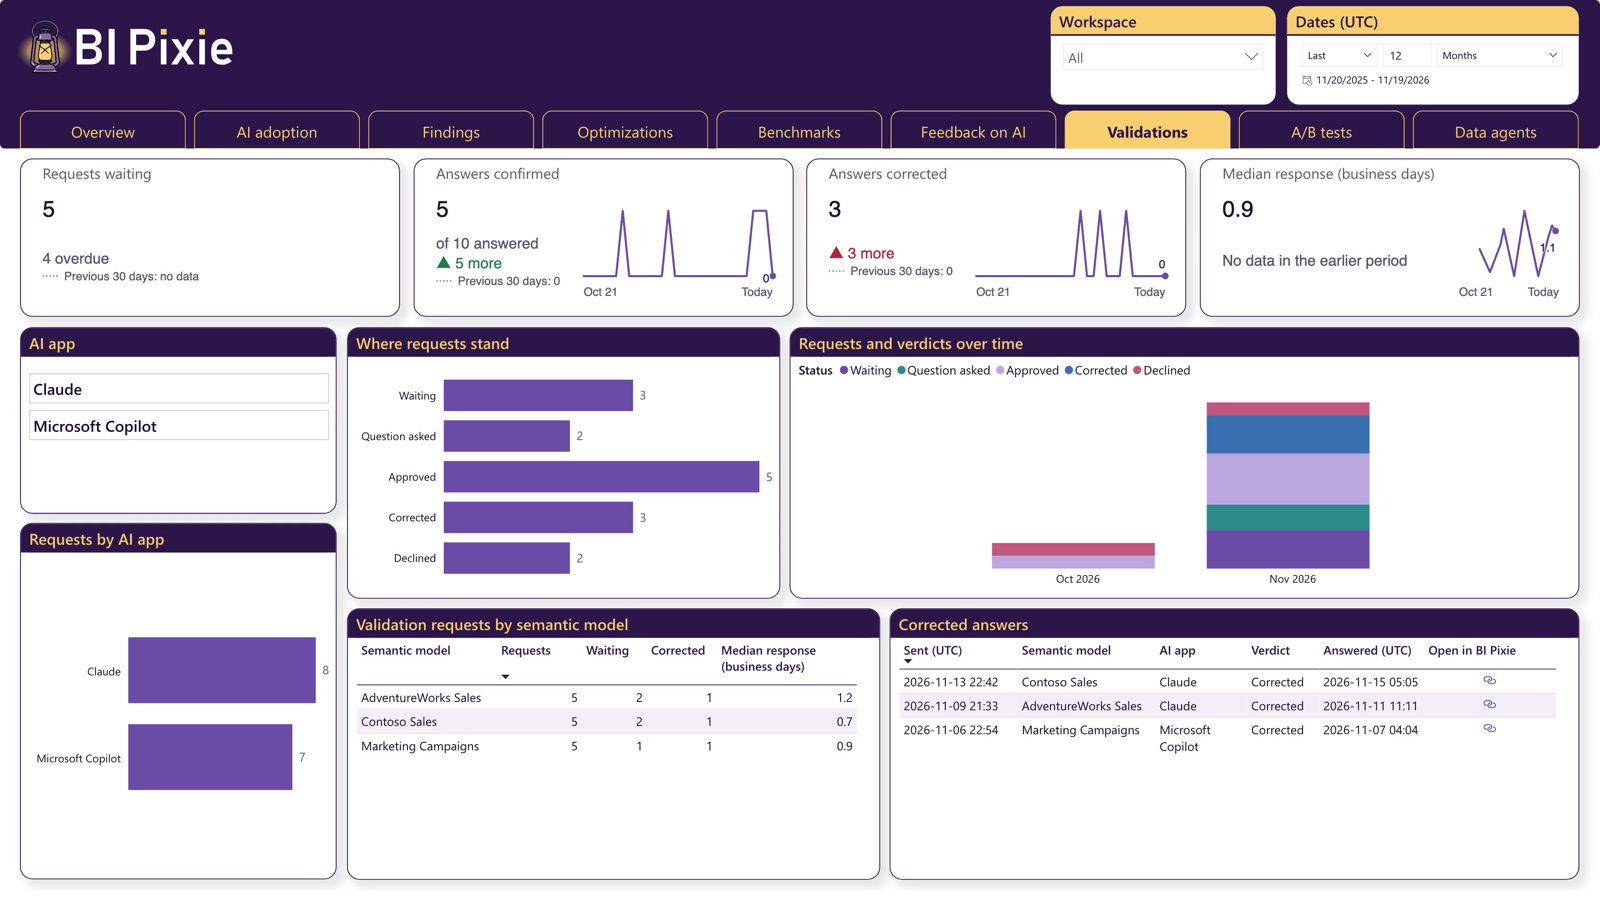
Both pages filter by AI app. Ratings and requests from before BI Pixie recorded the AI app read Not recorded. See AI Readiness Dashboard.
In the BI Pixie Dashboard
- On the User Satisfaction page, AI apps shows the ratings from AI apps for each semantic model, with their comments.
- Reports and AI apps compares satisfaction with your reports and satisfaction with AI answers for each semantic model, and gives one score for both.
Report feedback figures on Reports never include ratings from AI apps. If your dashboard has no AI apps view, it was installed before it held ratings: update the dashboard to add it. See User Satisfaction and Set up BI Pixie Dashboard.
Considerations and limitations
Names on ratings and requests
- A rating keeps the person's name and email address unless How BI Pixie identifies report viewers is set to Masked user names or Not collected. Its default is Email address, so ratings carry names from the moment you turn ratings on, unless you change it. See How BI Pixie identifies report viewers.
- While ratings carry no name, the comments in the BI Pixie Dashboard read "Name not shown" under Rated by, and its Department, Division and Country filters stay hidden.
- A validation request always names the person who sent it, whatever that setting says.
Where the card appears
- The card appears with answers that BI Pixie gives from a semantic model, in Claude through the BI Pixie connector and in Copilot. The BI Pixie MCP server you run on your own computer shows no card.
- In Claude, the card under the answer appears when Claude takes one last BI Pixie step after it answers. When Claude skips that step, the answer has no card.
- Where a Copilot app does not show the card, that answer cannot be rated.
- When an answer takes several queries, the card of an earlier query folds away, and a rating given on it carries over, so the answer counts one rating.
- While a benchmark runs on a semantic model, its answers carry no card.
- BI Pixie does not connect to ChatGPT, so no card appears there, although the AI apps settings name it.
- Only you can rate an answer or send a validation request, by selecting on the card or the page. Asking the AI in words to rate an answer or send a request saves nothing.
Validation requests
- A request with no answer expires after 14 days.
- When you reach the open or the daily limit, BI Pixie says which limit applies and how many requests it allows. See Limits and response time.
- The emails BI Pixie sends about a request carry one sentence and a link, never the question, the answer or a comment.
- A validation request never counts against your plan's benchmark question allowance.
What BI Pixie keeps
- BI Pixie keeps no answers from AI apps, except an answer a person sends for validation. Ratings and validation requests are kept with your account's AI Readiness data, in your account's region, and for as long as that data.
- Turning ratings and validation off removes the card and stops new ratings and requests. Ratings already given are kept.
- When a person is removed from your BI Pixie account, BI Pixie deletes their ratings and the validation requests they sent.
- For the full statement, see the Privacy Policy.